Kelly Anorak Sewalong Guide for Perfect Sewing Success
Embarking on a new project can evoke a blend of excitement and apprehension. Navigating the intricate world of fabric, patterns, and techniques often entails a learning curve that can be as steep as it is rewarding. This is a journey that invites creativity, precision, and a pinch of patience, culminating in a handmade piece that reflects your unique style and hard work.
Whether you are a novice seeking to hone your skills or a seasoned artisan looking for fresh inspiration, having a structured approach can make all the difference. By breaking down the process into manageable steps, one can transform a mere piece of cloth into a cohesive and stylish garment. The thrill of watching your vision come to life, stitch by stitch, serves as a powerful motivator and source of fulfillment.
Arming yourself with the right resources, tips, and insights is crucial in this endeavor. Fostering a community of like-minded individuals can further enhance your experience, as sharing knowledge and techniques enriches the art of creating. Together, let’s explore the essential elements that will guide you toward mastering your next crafting adventure with confidence and flair.
Understanding the Kelly Anorak Pattern
This segment delves into the intricacies of a widely appreciated outerwear design, highlighting its distinctive characteristics and functionality. By unraveling the elements of this blueprint, sewists can gain confidence and clarity in their construction endeavors, ensuring a rewarding crafting experience.
Features and Design Elements
The pattern boasts an array of functional aspects that cater to both style and practicality. With features such as adjustable hoods, spacious pockets, and a relaxed silhouette, this garment is ideal for various weather conditions. The use of waterproof materials enhances its utility, making it a versatile addition to any wardrobe.
Fabric Choices and Recommendations
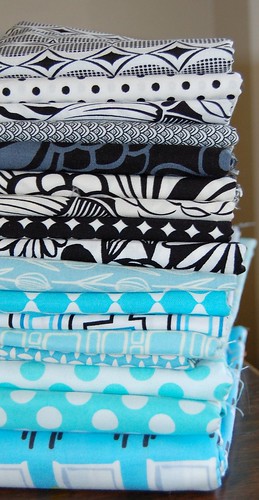
Selecting the appropriate fabric is crucial for achieving the desired look and performance of this garment. Recommended materials include lightweight nylon or coated cotton, which provide durability without sacrificing comfort. Additionally, considering the fabric’s breathability and water resistance will greatly influence the overall satisfaction with the finished piece.
Selecting the Right Fabrics
Choosing the appropriate materials is crucial to achieving an outstanding final product. The right fabric not only impacts the overall aesthetic but also influences functionality, comfort, and durability.
When considering fabric options, keep the following factors in mind:
- Weight: Consider how the weight of the material will affect drape and warmth. Lightweight fabrics are suitable for layering, while heavier options provide more insulation.
- Breathability: Fabrics that allow air circulation are ideal for outdoor wear, helping to regulate temperature and enhance comfort.
- Water Resistance: If the project is intended for wet conditions, selecting materials with water-repellent properties is essential.
- Durability: Select fabrics that can withstand wear and tear, especially if the garment will be used frequently or in rugged environments.
Here are some popular fabric types to consider:
- Nylon: A strong, lightweight fabric known for its resilience and water resistance.
- Polyester: Often blended with other fibers, it provides durability and retains color well.
- Canvas: A sturdy option ideal for outer garments that require extra protection and structure.
- Softshell: A versatile fabric that offers comfort, breathability, and moderate water resistance.
Ultimately, selecting the right material involves balancing aesthetic appeal with practical requirements to ensure a garment that performs well in its intended environment.
Essential Tools for Sewing Success
Achieving mastery in the art of garment creation hinges on the right set of equipment. Having quality materials at your disposal not only enhances the process but also elevates the overall outcome. Understanding which implements are crucial can set you on the path to superior craftsmanship.
Must-Have Items
- Sharp Scissors: Invest in a reliable pair designed specifically for cutting fabric to ensure clean edges.
- Measuring Tools: A measuring tape and ruler will help maintain accuracy throughout every phase, from cutting to hemming.
- Quality Pins: Opt for glass-headed or plastic-headed pins that won’t melt under heat and ensure your fabric layers stay in place.
- Seam Ripper: This handy tool makes it easy to correct mistakes without damaging the fabric.
- Iron: A steam iron is essential for pressing seams and giving your finished piece a professional look.
Helpful Accessories
- Cutting Mat: A self-healing mat provides a protective surface for cutting and prolongs the life of your blades.
- Tailor’s Chalk: Use chalk or fabric marker for marking adjustments and guidelines without leaving permanent marks.
- Thread: Select high-quality thread that matches the fabric for durability and an aesthetically pleasing finish.
- Bobbin Cases: Keep a selection of bobbins ready for various thread colors to streamline your workflow.
- Pattern Weights: These are useful for holding down patterns on fabric, providing stability while cutting.
Equipping yourself with these essential tools will not only facilitate a smoother crafting experience but also improve the quality of your projects significantly. The right accessories pave the way for creativity and provide the support needed to bring your vision to life.
Step-by-Step Construction Process
This section outlines a systematic approach to assembly, allowing you to create a polished garment with confidence. By guiding you through sequential steps, we aim to ensure that each phase is manageable and enjoyable. Let’s delve into the construction stages, focusing on clarity and precision to achieve a final product you can be proud of.
| Step | Description |
|---|---|
| 1 | Gather all necessary materials and tools, ensuring everything is prepared for a smooth workflow. |
| 2 | Begin by cutting out the fabric pieces according to the template, paying close attention to allowances and markings. |
| 3 | Assemble the main body sections first, using appropriate techniques to ensure durability and style. |
| 4 | Add any additional features, such as pockets or zippers, making sure they are aligned accurately. |
| 5 | Finish the edges and seams to prevent fraying and ensure a clean appearance, using methods that suit your fabric type. |
| 6 | Attach any final embellishments or details, taking the time to check placement and secure attachments effectively. |
| 7 | Conduct a thorough inspection of the finished piece, making any necessary adjustments for a perfect fit. |
Following these steps will help streamline the creation process, leading to a well-crafted piece that meets your expectations. Happy constructing!
Common Mistakes to Avoid
When embarking on a sewing project, it is essential to navigate the process with care to achieve a flawless outcome. Numerous pitfalls can lead to frustration and subpar results. By being aware of these common errors and how to prevent them, you can enhance your crafting experience and create a piece that you will be proud of.
1. Ignoring the Pattern Instructions
One of the most frequent missteps is neglecting to thoroughly read through the pattern instructions. Each design has specific requirements and steps that can significantly affect the final product. Take the time to understand each section and follow the guidelines closely.
2. Selecting the Wrong Fabric
Choosing an inappropriate fabric for your project can compromise both the look and functionality of your creation. Not all materials behave the same way when sewn, so it’s crucial to select one that aligns with the pattern specifications and your desired outcome.
| Mistake | Consequences | Solution |
|---|---|---|
| Ignoring pattern instructions | Poor fit and finish | Read carefully before starting |
| Using the wrong fabric | Incompatibility with design | Consult fabric recommendations |
| Neglecting to make a muslin | Fit issues after completion | Always create a test garment |
| Rushing the process | Cuts and mistakes | Take your time and be patient |
Tips for Seam Finishing Techniques
Achieving a polished edge in garment construction not only enhances the visual appeal but also contributes to the garment’s durability. Proper finishing methods prevent fraying and ensure that your seams remain intact over time. Below are a few strategies that will help elevate the quality of your work.
1. Zigzag Stitching
One of the simplest and most effective methods for sealing raw edges is employing a zigzag stitch. This technique allows the fabric to stretch while maintaining the integrity of the seam. Adjust the stitch width and length according to the fabric type; a narrow and dense zigzag works well with lighter materials, while a wider stitch is ideal for heavier fabrics. Be sure to test on a scrap piece to confirm the best settings.
2. French Seams
French seams are an excellent option for delicate fabrics, providing a clean finish that conceals raw edges. Start by placing the right sides of the fabric together and sewing a narrow seam. Trim the seam allowance, then turn the fabric inside out and stitch again, encasing the raw edges. This not only enhances the garment’s structure but also adds a touch of sophistication to the overall design.
Utilizing these techniques will not only improve the quality of your finished pieces but also add longevity to the garments you create. Experiment with different methods to discover which ones best suit your sewing style and the fabrics you enjoy working with.
Q&A: Kelly anorak sewalong
What materials do I need to gather before starting the Kelly Anorak sewing project?
Before you begin sewing the Kelly Anorak, it’s essential to gather all necessary materials to ensure a smooth sewing experience. You will need the sewing pattern for the Kelly Anorak, which you can purchase online. Additionally, you’ll require your fabric; a medium-weight water-resistant fabric is ideal, along with lining fabric for comfort. Make sure to have matching thread, interfacing for added structure, and notions such as zippers, buttons, and snap fasteners. Tools like fabric scissors, pins, a sewing machine, and perhaps a pressing iron are also crucial for achieving the best results.
How can I ensure I’m cutting the fabric correctly according to the pattern?
Cutting fabric accurately is vital for a successful sewing project. Start by pre-washing your fabric to prevent shrinkage later. Lay your fabric on a flat, clean surface and place the pattern pieces according to the layout guide provided in the pattern instructions. Pin the pattern securely to the fabric to prevent movement. Use a rotary cutter or sharp fabric scissors to cut along the edges, ensuring you cut on the correct side of the fabric as indicated in the pattern. Always double-check you are cutting the right sizes and make any necessary markings for notches or folding lines.
What sewing techniques should I be aware of when making the Kelly Anorak?
When sewing the Kelly Anorak, there are several techniques that can be particularly helpful. First, mastering the proper way to sew curved seams can significantly enhance the fit and appearance of the anorak. It’s also beneficial to practice sewing with water-resistant fabrics, as they may behave differently than regular cotton. Techniques such as topstitching, which can provide both strength and aesthetic appeal, and inserting zippers, require attention to detail for a polished finish. Lastly, learning how to create bound seams can help in maintaining the integrity of the anorak, especially if you’re using lightweight materials.
Are there any common mistakes I should avoid while sewing the Kelly Anorak?
Absolutely, there are several common pitfalls when sewing the Kelly Anorak that you can easily avoid. One major mistake is not reading the entire pattern instructions before starting; this can lead to confusion and mistakes during the sewing process. Additionally, ensure that you are using the correct needle and thread for your fabric type; using unsuitable tools can lead to issues such as skipped stitches or fabric damage. Another common error is rushing through the steps; take your time with each part of the sewing process to ensure accuracy and quality. Finally, don’t skip on pressing seams; pressing can significantly affect the final look of your garment, giving it a more professional finish.
Can I customize the Kelly Anorak, and if so, how?
Yes, the Kelly Anorak is highly customizable, allowing you to tailor it to your personal style and preferences. Start by choosing different fabric combinations, such as contrasting linings or using patterned fabrics for the sleeves or hood. Consider adding personal touches like unique buttons or zippers to enhance the overall look. You can also lengthen or shorten the pattern to better fit your body shape or create a more tailored silhouette. Adding additional pockets or changing pocket styles can increase functionality while giving your anorak a unique flair. Additionally, you may want to experiment with your stitching techniques, like incorporating decorative topstitching or using a contrasting thread for an eye-catching detail.
How do I start sewing the Kelly Anorak by Closet Core Patterns?
Begin by cutting out the pattern pieces for the Kelly Anorak by Closet Core Patterns. Make sure to draft and cut the pieces for the placket, yoke, and gusseted pockets. Follow the Closet Core instructions closely for each sewing part.
What type of seams are used in the unlined version of the Kelly Anorak?
For the unlined version of the Kelly Anorak, flat felled seams are used throughout. These seams provide durability and a clean finish on both the inside and outside of the jacket.
Where can I find a sew-along for the Kelly Anorak project?
You can find all the details and videos for the Kelly Anorak sew-along on Closet Core’s official website or their Instagram. There are also helpful videos on YouTube with key moments highlighted to guide you through the sewing process.
How are the snaps installed along the front of the Kelly Anorak?
To install the snaps along the front of the Kelly Anorak, use a plier tool or snap setting tool to secure the snaps in place. Be sure to mark the correct positions before installation using the pattern’s guidelines.
What tips should I follow when sewing the placket for the Kelly Anorak?
When sewing the placket pieces, make sure they are basted around the edges before stitching. This helps to hold everything in place and ensures the placket lies flat during construction. Use a triple stitch for added durability along the placket.
How do I sew the drawstring waist for the Kelly Anorak?
To sew the drawstring waist, follow the instructions in the pattern carefully. The drawstring casing is sewn into the jacket’s waist area, allowing for an adjustable fit. Be sure to thread the drawstring through the casing evenly, using a safety pin to guide it.
What’s the best way to finish the sleeve cuffs on the Kelly Anorak?
The sleeve cuffs on the Kelly Anorak can be finished using the placket pieces. After sewing the sleeve placket, fold and sew the cuffs following the pattern instructions, ensuring that the edges are basted before completing the stitching.
Where can I find patterns for the Kelly Anorak?
The Kelly Anorak pattern is available from Closet Case Patterns. You can visit their website to purchase the pattern, which includes all necessary details, as well as video links to help guide you through the sewing process. Closet Core Patterns is known for providing comprehensive sewing instructions, and the world on YouTube offers sewalongs that walk you through making this jacket step by step.
How do I use basting spray when making the Kelly Anorak?
Basting spray can be a great tool when sewing the Kelly Anorak by Closet Core Patterns. It helps hold fabric layers, such as the lining pattern and outer fabric, together without the need for pins. This makes it a lot easier to sew along seams without shifting or puckering. Simply spray a light mist between the fabric layers and press them together before sewing.
What’s the best way to install the anorak snaps on the Kelly Anorak?
When installing the anorak snaps on the Kelly Anorak, it’s essential to follow the illustration and instructions provided in the pattern by Closet Case Patterns. Make sure to mark the placement of the snaps on the right placket carefully. Using an awl to create small holes where the snaps will be installed makes the process easier and more precise. If you’re a beginner, practice installing snaps on a scrap piece of fabric before applying them to your jacket.
What size should I choose for the Kelly Anorak to ensure it fits perfectly?
To ensure the Kelly Anorak fits perfectly, refer to the size chart provided by Closet Core Patterns. Measure your bust, waist, and hips and compare them to the chart. The pattern is designed to fit true to size, so selecting the correct size from the chart should give you the right fit. If you find yourself between sizes, it’s best to size up, as you can make adjustments along the seams for a more tailored fit.
How do I incorporate a lining into the Kelly Anorak?
To add a lining to the Kelly Anorak, use the lining pattern provided in the pattern instructions. The lining helps give the jacket a professional finish and adds warmth. Sew the lining together as instructed, and attach it to the outer fabric by matching the front and back pieces. Sew along the edges, making sure everything is aligned. This will help your anorak take shape and ensure a neat and clean interior.
What’s the best way to learn how to sew the Kelly Anorak if I’m a beginner?
For beginners, Closet Core Patterns offers detailed instructions and sewalongs. Additionally, there are helpful sewing tutorials on the world on YouTube, where creators like Sew Sew Live and Guthrie Ghani Haberdashery walk you through the process of sewing the Kelly Anorak. These videos provide a clear transcript of each step, making it easier to follow along if you’re just starting out.
Where can I find more resources for sewing the Kelly Anorak?
You can find detailed instructions for the Kelly Anorak by Closet Core Patterns, along with helpful sewalongs. Many creators, like Sew Sew Live, have uploaded original content on YouTube that provides step-by-step guidance. These videos offer details and all the videos you need to understand the process, from installing the zip to finishing touches. If you love the look of the first jacket you make, you might even want to make another with variations in fabric and design.
How do I ensure a clean finish when sewing the zip on the Kelly Anorak?
To ensure a clean finish when sewing the zip on the Kelly Anorak by Closet Core Patterns, follow the instructions closely. The sewalongs by Sew Sew Live provide clear guidance on this part. You can also use basting spray to hold the fabric layers in place before sewing the zip. When assembling the jacket, make sure the pieces are aligned, and the zip is sewn together neatly. If you’re aiming for professional results, it’s worth paying extra attention to this step to achieve a polished look.