Tutorial for Sewing Perfect Knit Piping Techniques
Creating seamless and visually appealing embellishments can elevate your garment-making skills to new heights. This art form allows crafters to add dimension and character to their projects, making ordinary pieces come alive with flair. As you embark on this journey, understanding the fundamental principles behind these enhancing methods will lay the groundwork for your success.
The process involves a harmonious blend of creativity and technique, resulting in beautiful accents that complement your designs. With practice and patience, you will discover how to manipulate fabric in ways that yield striking results. The following sections will guide you through the essential steps, from selecting appropriate materials to executing your vision flawlessly.
As you immerse yourself in this craft, you will find satisfaction in developing your skill set and creating pieces that reflect your unique style. Embracing this challenge opens up a world of possibilities, enabling you to personalize your creations and leave a lasting impression through thoughtful details.
Essential Tools for Successful Piping
Achieving exceptional results requires the right equipment. The selection of appropriate materials and instruments greatly influences the outcome of your projects, ensuring that each detail is executed with precision and care. With a well-equipped workspace, you can enhance your process and creativity, leading to stunning finishes that elevate your creations.
To begin with, high-quality fabric is fundamental. Opt for textiles that exhibit good stretch and drape characteristics, as they will yield improved results. Additionally, a reliable cutting tool is indispensable for achieving clean, accurate edges. Scissors or rotary cutters that offer ease of handling and exceptional sharpness are ideal for this task.
Another vital component is a strong thread that complements your chosen fabric. It should possess the right elasticity to prevent breakage during use. A sturdy sewing machine capable of handling various materials can significantly contribute to seamless assembly. Ensuring the machine has specialized feet for piping enhances versatility and delivers professional outcomes.
Finally, don’t underestimate the value of a quality iron for finishing touches. A steam iron will help in manipulating curves and achieving crisp edges, finalizing your work with a polished appearance. By using these essential items, you will set yourself up for success in your creative endeavors.
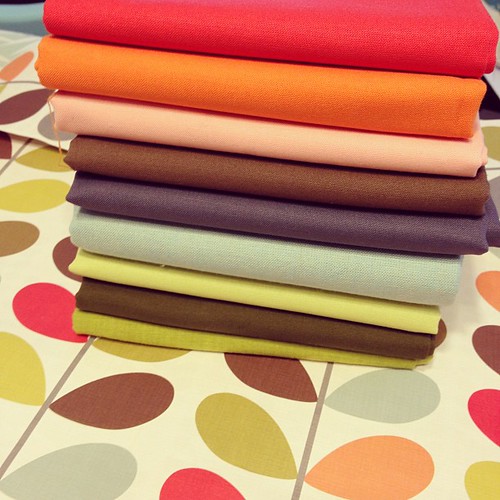
Choosing the Right Knit Fabrics
When embarking on a creative project that involves flexible materials, selecting the appropriate fabric is crucial to achieving a successful outcome. Different textiles possess varying properties that can significantly impact the overall look and feel of your creation.
Consider the weight of the fabric; lighter materials may drape beautifully, while heavier options can provide structure and support. Additionally, stretchability plays a vital role–some fabrics offer a lot of give, making them ideal for garments that require a snug fit, while others have minimal stretch, which can influence the ease of assembly.
Furthermore, take into account the texture of the fabric. Smooth surfaces might be easier to work with for intricate designs, while textured fabrics can add depth and interest to finished pieces. Color and pattern should also be factored in, as they can either enhance or detract from the overall design aesthetic.
Ultimately, a thoughtful selection process will enable you to find the right foundational materials that align with your vision, ensuring that the final product not only meets your expectations but also showcases your unique style.
Mastering Seam Techniques for Piping
Achieving seamless integration in fabric crafts requires an understanding of various methods that enhance the aesthetic appeal of your projects. A well-executed seam can elevate the design and provide a polished finish, giving your creations a professional touch. This section delves into the essential approaches that refine this aspect of your craft.
To successfully work with decorative borders, consider the following strategies:
- Choosing the Right Thread: Selecting a thread that matches or complements your fabric is crucial for maintaining continuity and enhancing the overall look.
- Pinning Technique: Use an ample amount of pins to secure your layers, ensuring they remain in position during the stitching process.
- Precision Cutting: Accurate cutting of the fabric edges is fundamental for achieving clean and consistent seams, reducing unwanted bulk.
- Stitching Distance: Maintain a consistent seam allowance, as this will contribute to the neatness and symmetry of your work.
- Using a Guide: Employing a presser foot guide or a fabric marking tool can help keep your stitches straight and evenly spaced.
By incorporating these approaches into your craft, you will not only refine your skills but also enhance the beauty and functionality of your fabric designs. Practice and experimentation will lead to mastery, enabling you to create stunning pieces with confidence.
Creating Accurate Piping Strips
The process of crafting precise accent strips is essential for achieving a polished look in any fabric project. By properly measuring and cutting the material, you can ensure that the finished result is both functional and aesthetically pleasing. Each step requires attention to detail, especially when it comes to the dimensions and alignment of the strips.
Materials Needed
| Item | Purpose |
|---|---|
| Fabric | To create the strip |
| Measuring tape | For accurate measurements |
| Rotary cutter | For precise cutting |
| Ruler | To guide the cutting process |
| Iron | To press and shape the strips |
Steps to Achieve Precision
Start by determining the desired width for the accents. Measure and mark the fabric accordingly, ensuring that the cuts are straight and even. A rotary cutter paired with a ruler provides the best accuracy for this task. Once all strips are cut, pressing them with an iron will help maintain their shape and prepare them for application. Properly prepared strips will lead to a more professional finish in your projects.
Finishing Edges for a Polished Look
Achieving a sleek and refined appearance in your projects greatly depends on how you handle the edges. The finishing touches elevate the overall aesthetic, ensuring that every detail is thoughtfully considered. By utilizing various methods, you can create seamless transitions that enhance the beauty of your creation.
One effective approach is to use bias tape, which not only reinforces the edges but also adds a decorative element. This versatile option allows you to customize the color and pattern, creating visual interest as well as functionality. When applied correctly, bias tape hugs the edges snugly, giving a clean and tidy finish.
An alternative approach involves using a serger, which provides a professional-grade edge by trimming and finishing in one step. This technique prevents fraying and secures the fabric layers together, resulting in a durable and neat outcome. Mastering this method can save time while enhancing the longevity of your items.
Additionally, incorporating interfacing can significantly improve edge stability. This backing material adds structure, making it easier to manage curves and corners. With interfacing in place, finished edges remain crisp and polished, lending a high-quality appearance to your work.
Lastly, remember to take your time while working on the edges. Precision in each step ensures that the final product reflects your attention to detail and dedication to craftsmanship. Whether you choose bias tape, a serger, or interfacing, the right edge finishing technique contributes greatly to a sophisticated presentation.
Adding Piping to Various Projects
Incorporating decorative trim into your creations can elevate their appearance and add a professional touch. This embellishment can be utilized in numerous applications, enhancing everything from garments to home decor. Exploring various projects allows for creativity and experimentation with colors, textures, and patterns, making each piece unique.
Garment Enhancement
Adding embellishing trim to clothing can define seams and provide a stylish contrast. Whether you are crafting a dress, skirt, or top, consider integrating this decorative detail along the neckline or hem for an eye-catching finish.
Home Decor Applications
When it comes to home furnishings, embellishing trim can play a significant role in revitalizing the look of cushions, curtains, and quilts. This subtle addition can unify colors and patterns, creating a cohesive design throughout your living space.
| Project Type | Recommended Placement | Fabric Suggestions |
|---|---|---|
| Garments | Necklines, Hems, Sleeves | Cotton, Silk, Jersey |
| Home Decor | Cushions, Curtains, Quilts | Canvas, Linen, Velvet |
| Accessories | Bags, Hats, Scarves | Denim, Leather, Wool |
Q&A: Tutorial sewing knit piping
What materials do I need to create knit piping for my sewing projects?
To create knit piping for your projects, you will need a few essential materials. First, choose a knit fabric that complements your main project fabric. You will also need piping cord (a cotton or polyester cord works well) to give your piping its characteristic shape. Don’t forget to prepare your sewing machine with a zipper foot or a piping foot, which will help you sew the piping accurately. Additionally, having scissors, pins, and matching thread on hand will make the process smoother. The combination of these materials will ensure you achieve a professional-looking knit piping.
Can I use any type of knit fabric for piping, or do I need a specific kind?
While you can theoretically use any type of knit fabric to make piping, it’s best to choose a knit that has a stable structure, like ponte or cotton spandex. These types of knits hold their shape well and can be sewn easily without stretching excessively. Avoid very stretchy fabrics, such as lightweight jersey, as they might lead to a piping that curves or warps during the sewing process. Additionally, consider the weight of the fabric in relation to your main project to ensure that the piping will integrate seamlessly.
What is the best way to attach knit piping to my sewing project without any puckering?
To attach knit piping without puckering, there are several techniques you can follow. First, make sure your piping is prepared correctly; it should not be pulled tightly while you sew. Instead, gently guide it and allow the fabric to ease into the stitching line. Using a walking foot or a piping foot can help manage layers as you sew, maintaining an even feed through the machine. It’s also crucial to baste the piping in place before the final stitching to prevent it from shifting. Finally, sew with a straight stitch or a stretch stitch to accommodate the knit fabric, which will allow for some give without puckering your seams.
How do I modify a regular pattern to incorporate knit piping?
Modifying a regular pattern to include knit piping involves a few simple steps. First, decide where you want the piping to be placed – commonly, it is added along seams or edges. Next, add seam allowances to your pattern pieces where the piping will attach, typically an extra 1/4 inch for most piping methods. When cutting your fabric, ensure that the pieces are properly aligned with your piping placement. Then, follow the steps from the piping tutorial to sew the piping into those seams. Always make a sample piece first if you’re trying this for the first time, as it allows you to adjust any techniques without risking your main fabric.
Are there any tips for achieving a professional finish when sewing knit piping?
Absolutely! To achieve a professional finish when sewing knit piping, consider the following tips. First, take your time with the prep work; ensuring your piping is correctly sized and neatly folded will make a big difference. Use high-quality thread and needles suitable for knits—this will prevent fabric snags. Pay attention to your sewing machine settings; use a longer stitch length for piping to maintain fabric integrity. Additionally, pressing your seams as you go can help maintain a crisp finish. Finally, for an extra touch, consider topstitching along the piping after attaching it to provide a clean, decorative edge that enhances your project’s overall look.
What are the essential tools needed for sewing knit piping, and why are they important?
To sew perfect knit piping, you’ll need several essential tools: a sewing machine with a zigzag or stretch stitch option, a piping foot or zipper foot (which helps guide the piping accurately), fabric scissors, pins or clips, and of course, knit fabric and piping cord. These tools are important because the right sewing machine settings and foot types allow for more precise stitching and create clean edges, preventing fraying. Additionally, sharp scissors ensure clean cuts in the fabric, and using pins or clips helps hold the fabric securely while you sew, resulting in a smoother finish.
Can you explain the process of attaching knit piping to a garment step by step?
Certainly! Here’s a step-by-step process for attaching knit piping to a garment: First, prepare your piping by cutting it to the desired length and ensuring the cord is inserted correctly into the fabric casing. Next, place the piping along the edge of your garment piece, aligning the raw edges. Use a pin or clip to secure it. Now, set your sewing machine to a stretch or zigzag stitch, as this ensures the fabric moves without breaking when worn. Sew the piping to the garment, ensuring you stitch close to the piping cord for a neat finish. After attaching the piping, you can trim any excess fabric or piping for a clean edge. Finally, press the seam allowance away from the garment to give it a polished look. Following these steps will help you achieve a well-structured and aesthetically pleasing finish!
How do I sew piping along curves in a garment?
To sew piping along curves, especially on garments like the Carolyn Pajamas, cut the piping on the bias to make it more flexible. Use a pressure foot and keep your needle down and raise it as you sew directly along the curve. For tight corners, take it slow and use small stitches to ensure the piping fits smoothly. Trim the seam allowance to help the fabric bend around the curve.
What’s the trick to sewing flat piping with woven fabric?
When sewing flat piping with woven fabric, cut the fabric for the piping on the bias to give it flexibility. Place the piping’s folded edge on the right side of the garment fabric and sew directly along the edge. Make sure the piping is sewn securely using a zig-zag stitch or another strong stitch that matches the woven fabric’s thickness. This will ensure it lays flat and looks professional.
How do I insert elastic into the waistband of a sewing project?
To insert elastic into a waistband, sew a casing using the fabric’s wrong side. Attach a safety pin to the elastic cord and thread it through the casing. Once it’s fully threaded, overlap the elastic ends and sew them together securely. Stretch the fabric out evenly to distribute the elastic. Finally, sew the opening of the casing closed with a neat line of stitching.
What kind of elastic is best for stretch fabric projects?
For stretch fabric projects, an elastic cord that has good flexibility and recovery is ideal. Look for elastic that is durable yet lightweight, so it won’t add too much bulk to garments like leggings or waistbands. It should easily conform to the fabric’s stretch while still providing a snug fit. When using elastic on stretch fabric, test it first by sewing a small zig-zag stitch.
How do I ensure piping is sewn evenly along the collar of a garment?
To ensure piping is sewn evenly along a collar, first baste the piping to the collar’s right side before attaching the other layers. Use a zipper or piping foot to sew directly along the piping cord. Keep your needle down when turning tight curves to avoid gaps or uneven spacing. Finish by sewing a second line of stitching, which secures the piping and the collar together neatly.
What’s the best way to cut fabric for piping?
The best way to cut fabric for piping is to cut on the bias. This gives the fabric for the piping enough stretch and flexibility to go around tight curves and corners. You want to use a sharp rotary cutter to ensure clean, straight edges. Cutting on the bias also helps the piping sit neatly when sewn into garments like jackets or collars.
How do I sew directly over an elastic cord without damaging it?
To sew directly over an elastic cord, adjust your machine to a zig-zag stitch. This allows the fabric to stretch around the elastic without tearing. Keep the elastic cord centered under the presser foot and maintain an even stitch length. If your elastic is quite thick, use a slightly larger needle to avoid breaking it while sewing.
What’s the trick to keeping piping smooth on tight corners?
The trick to keeping piping smooth on tight corners is to keep your needle down and raise the presser foot slightly as you approach the corner. Cut small slits into the piping’s seam allowance to help it bend around tight curves more easily. Sew slowly, making small adjustments as needed, and make sure the cord inside the piping stays aligned with your stitching line.
How do I sew piping along the edges of woven fabric?
To sew piping along the edges of woven fabric, first place the piping’s folded edge along the right side of the fabric. Pin it in place, then use a zipper foot to sew directly along the piping cord. Keep the needle down as you turn corners, and make sure the fabric for the piping is cut on the bias to ensure smooth curves and bends.
What sewing patterns work best with elastic waistbands?
Sewing patterns like the Carolyn Pajamas or any patterns for lounge pants or skirts work well with elastic waistbands. These patterns often provide detailed instructions on how to sew a casing and insert elastic. Make sure to use elastic that’s the right width for the pattern, and follow tips and tricks like overlapping the elastic ends before securing them to avoid bulkiness.
How do I use piping for decorative seams on a garment?
To use piping for decorative seams, baste the piping to the right side of the fabric, placing it along the seam line. Then sew the garment pieces together with the piping sandwiched in between. A zipper foot or piping foot will help you sew close to the piping cord. This adds a professional, decorative touch to seams, such as on a jacket collar or pocket edges.
What is the function of a pressure foot when sewing piping?
The pressure foot helps keep the fabric flat and in place as you sew piping along curves or edges. A zipper or piping foot allows you to sew directly along the piping cord, ensuring your stitches are tight and even. This helps maintain the piping’s position without shifting, especially on thick or textured fabrics like wool.
What are some key moments when sewing flat piping on a garment?
Key moments when sewing flat piping include cutting the fabric on the bias for flexibility, aligning the piping’s folded edge with the garment fabric’s right side, and using a pressure foot to sew directly along the piping. It’s also important to keep your needle down and raise the foot when turning corners or curves, ensuring the piping stays smooth and even.