Free DIY Leather Belt Bag Pattern for Stylish Accessories
In a world where personal expression meets practical functionality, the allure of handmade creations holds a special place. Taking on a project that allows one to blend artistry with usability presents an exciting opportunity for anyone looking to enhance their wardrobe. Such endeavors not only cultivate creativity but also offer a chance to craft items that perfectly reflect individual style.
Exploring the realm of unique creations can lead to the development of one-of-a-kind pieces that elevate any outfit. With a bit of inspiration and guidance, enthusiasts can transform basic materials into eye-catching items that are not only beautiful but also serve a purpose. From choosing the right materials to understanding the fundamentals of design, crafting these essential pieces can be a fulfilling journey.
Embracing the joy of creating new items fosters a sense of accomplishment and uniqueness in one’s collection. As you embark on this engaging path, consider the endless possibilities that await. With each stitch and detail, you will not only enhance your style but also bring a personal touch to your accessories, setting yourself apart from the crowd.
Discover the Charm of Leather Belt Bags
In a world where practicality meets elegance, small carriers have become essential companions in our daily lives. They blend convenience with a unique flair, allowing individuals to express their personalities while keeping their essentials close at hand. The allure of these compact holders lies in their versatility and timeless appeal, suitable for any occasion, from casual outings to formal gatherings.
Crafted from high-quality materials, these exquisite creations add a touch of sophistication to any ensemble. They come in various styles and colors, making it easy for anyone to find a design that resonates with their personal taste. The durability and rich texture enhance their charm, ensuring that they not only look good but also withstand the test of time. Owning one not only elevates your wardrobe but also serves as a statement piece that draws admiration.
These handy companions provide the perfect solution for those who value both fashion and functionality. Whether you’re running errands, attending an event, or exploring new places, they offer an ideal way to carry your essentials without compromising on style. Embrace the charm of these practical and fashionable pieces, and let them become a staple in your everyday look.
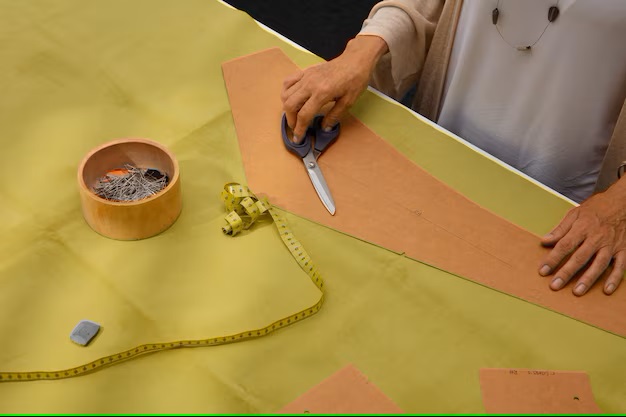
Step-by-Step Guide to Crafting Your Bag
Creating your own unique carry-all can be a fulfilling and creative endeavor. This guide will walk you through each stage of the process, from gathering materials to the final touches, allowing you to design a functional yet fashionable item that reflects your personal style.
Before you get started, ensure you have all necessary tools at hand. A well-prepared workspace will enhance your experience and lead to better results.
| Step | Description |
|---|---|
| 1 | Gather materials such as fabric, thread, and closure mechanisms. |
| 2 | Cut the fabric according to your measurements, ensuring precision for a polished finish. |
| 3 | Begin assembling by sewing the primary components together, paying attention to alignment. |
| 4 | Add pockets and other features to enhance usability and aesthetics. |
| 5 | Attach any closures securely to ensure easy accessibility while maintaining style. |
| 6 | Finish the edges to prevent fraying and to achieve a neat appearance. |
| 7 | Inspect the final product to check for quality and make adjustments as necessary. |
By following these steps, you will create a beautiful and practical companion that perfectly suits your needs. Enjoy the process of making and let your creativity shine!
Essential Tools for Leather Projects
Creating beautiful and functional items from natural materials requires a set of specific implements that ensure precision and efficiency. Selecting the right tools can significantly affect the final outcome, enhancing both the craftsmanship and enjoyment of the process.
Cutting tools are fundamental for achieving clean edges and accurate shapes. A sharp knife or rotary cutter will provide the necessary precision for your designs. Additionally, cutting mats protect your workspace while allowing for smooth and safe cutting.
To securely join pieces together, fasteners like rivets, snaps, and clasps are essential. These components not only enhance durability but also contribute to the aesthetic appeal of the finished product. A reliable hammer is crucial in this stage, enabling you to securely attach the fasteners with ease.
Needles and thread are vital for stitching, offering strength to withstand daily use. Choosing the right size and type of needle, along with a high-quality thread, ensures neat and reliable seams. Awls are equally important, as they create precise holes for stitching, preventing damage to the material.
Finally, a quality edge tool will give your project a polished appearance. Finishing the edges properly not only improves the look but also adds to the longevity of your creation. Investing in the right tools will transform your artistic vision into tangible results.
Choosing the Right Leather Material
Selecting the appropriate material can significantly enhance the overall appearance and functionality of your crafted item. The texture, weight, and durability of the fabric play a crucial role in determining the final aesthetic and usability. Understanding the various types available will help you make an informed decision that aligns with your vision.
Types of Available Materials
There are several categories to consider when choosing your fabric:
- Full Grain: Renowned for its natural surface, this option retains the original texture and markings.
- Top Grain: Slightly processed to remove imperfections, it balances durability with a refined look.
- Split: This variant is made from the lower layers, offering a unique texture but less durability.
- Suede: Soft and velvety, it adds a luxurious feel but may require more care.
Factors to Consider
When making your selection, consider the following aspects:
- Use Case: Think about how the item will be used and choose a material that withstands wear and tear.
- Weight: Heavier options provide sturdiness, while lighter materials may offer flexibility.
- Finish: A smooth finish gives a contemporary look, whereas textured surfaces can add character.
- Color: Choose shades that complement your overall design, keeping in mind fading over time.
By carefully evaluating these options, you’ll ensure that your selection not only meets your aesthetic desires but also performs well in everyday use.
Creative Ways to Customize Your Design
Adding a personal touch to your creation can elevate it from ordinary to extraordinary. By experimenting with various techniques, you can incorporate unique elements that reflect your individual style and preferences. Here are some innovative ideas to transform your project into a one-of-a-kind piece.
Innovative Techniques
- Stitching Variations: Utilize different stitching patterns to create visual interest. Consider using contrasting colors or mixing styles for a personalized look.
- Embellishments: Incorporate beads, studs, or patches to enhance the aesthetic appeal. These details can add depth and character.
- Paint or Dye: Experiment with fabric paint or dye to introduce bold colors and designs. This technique allows for endless creativity.
- Unique Hardware: Swap out standard fasteners for distinctive ones. Choose closures that stand out and make a statement.
Personalized Additions
- Monograms: Personalize your item with initials or names to create a unique identifier. This adds a sophisticated touch.
- Functional Features: Think about adding compartments or pockets that cater to your needs while maintaining style.
- Thematic Elements: Base your design on specific themes or inspirations, such as nature, art, or culture, to create a meaningful connection.
- Seasonal Adjustments: Change accessories or colors according to seasons or occasions, keeping your creation fresh and relevant.
By implementing these creative modifications, your item will not only serve its purpose but also showcase your personality and artistic flair. Embrace the opportunity to innovate and let your imagination guide your design journey.
Styling Tips for Any Occasion
Finding the right way to enhance your outfit can elevate your overall look while expressing your personal style. Accessorizing thoughtfully can transform everyday attire into something extraordinary, making you stand out in various settings.
Casual Outings
For relaxed gatherings, consider incorporating pieces that exude comfort yet maintain a chic vibe. Pair a cozy top with well-fitted jeans and add a statement piece to draw attention. You might choose an eye-catching pendant or a vibrant scarf to bring an element of fun to your ensemble. Opt for versatile footwear, such as stylish sneakers or ankle boots, to complete the laid-back aesthetic.
Formal Events
When attending an elegant affair, focus on refinement and elegance. Select tailored garments that complement your body shape, and incorporate subtle yet impactful embellishments. A delicate clutch or a pair of sophisticated earrings can elevate your appearance without overwhelming it. Stick to classic color palettes, adding a pop of color through your choice of footwear or jewelry to create balance and harmony.
Q&A: Free pattern diy leather belt bag
What materials do I need to make the DIY leather belt bag?
To create your own DIY leather belt bag, you will need the following materials: high-quality leather (about 1-2 square feet should suffice), a matching leather sewing thread, a belt buckle or clasp for closure, scissors, a ruler, an awl for making holes, and a sewing machine or hand-sewing needle. Optional materials include leather dye for coloring, a cutting mat, and pattern paper to trace your design before cutting the leather. Ensure that your tools are sharp and that you have a dedicated workspace to make the process as smooth as possible.
Is this pattern suitable for beginners in leather crafting?
Yes, this DIY leather belt bag pattern is beginner-friendly! The design is simple and requires basic leatherworking skills, such as cutting, stitching, and fastening. The step-by-step instructions provided make it easy to follow along, even for those who are new to leather crafting. It’s a great project to help you gain confidence in handling leather and improve your sewing techniques. Just be sure to take your time and practice the sewing techniques on scrap pieces of leather if you’re unsure!
Can I customize the leather belt bag pattern to suit my personal style?
Absolutely! The DIY leather belt bag pattern is designed for customization. You can adjust the size, shape, and features of the bag to better fit your style and needs. For instance, you could add embellishments like rivets or studs, try different colors or textures of leather, or incorporate additional pockets for more functionality. Additionally, you can change the hardware used for the closure or even add a decorative strap. This flexibility allows you to create a unique accessory that reflects your personal style!
How long does it typically take to complete the leather belt bag project?
The time to complete the DIY leather belt bag project can vary based on your skill level and how detailed you wish to be with your design. For beginners, the entire process—including cutting, stitching, and finishing—can take anywhere from 3 to 5 hours. Experienced crafters may complete it in 1 to 2 hours. It’s best to allocate ample time, especially if you’re working on a custom design. Remember, taking your time will lead to a better-finished product!
What materials are recommended for making a fanny pack using the provided tutorial on YouTube?
For making a fanny pack, the tutorial suggests using materials like vegetable-tanned leather, vinyl, or nylon, which are durable and can withstand daily wear. These materials allow you to create a stylish and functional waist bag that can easily hold your essentials like a wallet. The tutorial provides a step-by-step guide on how to sew leather or vinyl, ensuring that even beginners can follow along.
How can I access the PDF pattern for the fanny pack, and what do I need to do to download it?
To access the PDF pattern for the fanny pack, you need to download the free pattern from the website linked in the tutorial. You may need to subscribe to the channel or become a member to get access to exclusive content. Once you’ve done that, you can simply click the download link, and the PDF will be saved to your device for printing. Feel free to leave a comment if you have any questions during the process!
What are some tips for sewing the flap and ensuring it fits securely on the fanny pack?
When sewing the flap of the fanny pack, make sure to carefully measure and cut the fabric according to the improved pattern dimensions provided in the tutorial. Topstitching around the flap helps secure it in place while also adding a decorative touch. Use a strong clip to hold the flap while sewing, and don’t forget to press the seams for a tidy finish. This ensures that the flap fits securely and enhances the overall look of the bag.
How do I make sure the fanny pack is big enough to hold my essentials without being too bulky?
To ensure your fanny pack is big enough but not overly bulky, refer to the width and dimensions specified in the PDF pattern. Consider the layout of your contents, like a wallet and other essentials, and adjust the size of the pouch if necessary. The tutorial offers guidance on how to fold and assemble the bag so that it remains compact while still providing ample access to your items.
What steps should I take if I want to use leather or vinyl to make the fanny pack?
If you want to use leather or vinyl to make the fanny pack, start by downloading the PDF pattern that includes instructions for making the bag from these materials. Make sure to have the right tools, such as a heavy-duty sewing machine and appropriate needles for leather or vinyl. The tutorial on YouTube walks you through each step, from cutting the pieces to sewing them together, ensuring you feel confident in your project.
How can I stay updated on new tutorials or patterns available for sewing projects like the fanny pack?
To stay updated on new tutorials or patterns, make sure to subscribe to the YouTube channel where the fanny pack tutorial is hosted. You can also sign up for the newsletter to receive notifications about new content, patterns, and sewing tips. By becoming a member, you’ll get access to exclusive content that can enhance your sewing experience and provide you with fresh project ideas.
Is it possible to modify the fanny pack pattern to create a gentleman’s hip bag, and how would I go about it?
Yes, it’s possible to modify the fanny pack pattern to create a gentleman’s hip bag. You can adjust the dimensions of the bag to achieve a sleeker silhouette and perhaps use more neutral fabrics like leather or high-quality nylon. The tutorial can provide you with specific instructions on making adjustments, and you could also use different colors or textures to create a more sophisticated look tailored for gentlemen.
What type of hardware is necessary for constructing the fanny pack, and where can I find it?
For constructing the fanny pack, you will need hardware such as a buckle, clip, and possibly grommets for added detail. These items can often be found at local fabric stores, craft shops, or online retailers. The tutorial may include links to recommended suppliers where you can purchase the necessary items. If you prefer, you can also explore options on platforms like Amazon, where you can earn from qualifying purchases through affiliate links.
How can I add personalization to my fanny pack once I’ve completed the sewing project?
Once you’ve completed sewing the fanny pack, consider adding personalization through embroidery, patches, or fabric paint. This allows you to make the bag uniquely yours and enhances its aesthetic appeal. You could also use contrasting fabric for the lining or piping along the edges to give it a custom touch. The tutorial encourages creativity, so feel free to explore different options to make it stand out.
What should I do if I encounter any difficulties while following the fanny pack tutorial?
If you encounter difficulties while following the fanny pack tutorial, you should leave a comment on the video for guidance, as the sewing community is often very supportive. You can also refer back to the transcript or revisit specific sections of the tutorial for clarification. Additionally, there are often forums and online groups where you can seek advice and share your progress, helping you overcome any challenges you may face during your project.
How can I find high-quality sewing patterns on the world on YouTube?
To find high-quality sewing patterns on the world on YouTube, you can start by searching for specific channels that specialize in sewing tutorials. Many creators upload original content that includes step-by-step guides for various projects. You can also check out their library of videos for a range of patterns, from garments to accessories. Don’t forget to grab any accompanying PDF downloads or links in the video descriptions for extra resources.
What materials do I need to create a bag that includes a quilted design?
To create a bag with a quilted design, you’ll need a few essential materials. Start with fabric for both the exterior and lining, such as cotton or canvas. You’ll also need batting for the quilted effect, along with sewing notions like tape for securing seams and a good pair of scissors. Depending on your pattern, you may require additional items like zippers, snaps, or buttons. The front piece of your bag will also need to be cut carefully to ensure it fits the overall design.
If I want to create a bag with a specific design, where should I start?
If you want to make a bag with a specific design, the first step is to sketch your ideas or find inspiration online. Consider checking blogs that feature sewing patterns or video tutorials, as they often provide detailed instructions and patterns to help you create your desired bag. If you plan to upload original content, document each stage of your project, as it could also inspire others looking to create similar designs.
What should I do if I forget my password for an online sewing pattern library?
If you forget your password for an online sewing pattern library, look for a “forgot password” option on the login page. Following the prompts will usually allow you to reset your password via your email. If that option isn’t available, contact the library’s customer service for assistance. It’s important to keep your login details secure to ensure you won’t miss out on accessing new patterns and content.
How can I ensure the bag I’m making will be functional for daily use?
To ensure the bag you’re making will be functional for daily use, consider the size, pockets, and overall design. Think about what items you’d like to carry, such as a wallet, keys, and a phone, and plan the bag’s dimensions accordingly. Adding pockets on the side of the bag or within the interior can help with organization. Make sure to reinforce areas that will experience stress, like the corners, to enhance durability.
What are some common mistakes to avoid when sewing a bag?
Some common mistakes to avoid when sewing a bag include not pre-washing your fabric, which can lead to shrinking, and failing to measure accurately, resulting in a bag that won’t fit your intended items. Additionally, neglecting to secure seams with tape or using the wrong thread type can compromise the overall strength and appearance of your bag. Always follow the step-by-step instructions closely, and don’t rush through the process to ensure a polished final product.