Sewing Techniques for Creating Perfect Zipper Overlap on Jumpsuit
To achieve a polished look on your bodysuit, prioritize the alignment of your closure with the garment’s seam lines. Begin by choosing a suitable fastener length that accommodates your design and maintains a seamless appearance. This ensures your piece fits snugly without compromising aesthetics.
Utilize interfacing on the fabric where the fastener will be inserted. This step prevents distortion during stitching and provides additional support, creating a cleaner finish. Ensure your fabric pieces are accurately marked for consistent placement, avoiding any misalignment.
Experiment with varying stitching patterns when attaching the closure. A topstitch can add durability and style, while an invisible stitch offers a discreet look. Adjust your seam allowance according to the fabric type, allowing for flexibility without sacrificing integrity.
Finishing techniques play a significant role in overall appearance. Consider options such as bias binding or facing to encase raw edges. This adds sophistication and helps prevent fraying, contributing to the longevity of your design.
Lastly, practice patience. Precision in each step, from measuring to stitching, will result in a well-crafted bodysuit that showcases your skills and style.
Choosing the Right Zipper Type for Jumpsuits
Opt for a heavy-duty separating model for convenience and durability. This choice allows for easy wear and removal, essential for fitted garments. Look for plastic or metal teeth based on the aesthetic you desire; metal provides a classic look while plastic can add a modern twist.
Consider an invisible variety for a sleek appearance. This option minimizes visible stitching and maintains a clean silhouette, perfect for more tailored designs. Ensure the weight of the fabric aligns with the chosen closure type to avoid puckering.
For a sporty look, a nylon coil variant offers flexibility and is lightweight, making it suitable for casual outfits. Additionally, assess the length required–shorter lengths work well for styles with fewer layers, while longer ones accommodate more complex designs.
Pay attention to the pull tab; it should be comfortable to grasp and operate. This detail enhances user experience, making it easier to fasten and unfasten the garment.
Always match the color and finish to the fabric. A well-coordinated closure adds a professional touch and can enhance the overall design. Test different options with swatches to see how they interact with the material before making a final decision.
Preparing Fabric and Zipper for Overlap Installation
Prewash your fabric to prevent shrinkage. This ensures your final garment maintains its intended fit. Iron the fabric to remove any wrinkles, creating a smooth surface for the assembly process.
Choose a suitable fastening mechanism that complements your fabric type; opt for nylon or metal options based on durability needs. Ensure that the length of the selected fastener matches your design requirements precisely, allowing for a seamless integration into the garment.
Cutting and Marking
Measure and cut your fabric accurately. Use a rotary cutter or sharp fabric shears for clean edges. Mark the placement of the fastening device on the fabric with tailor’s chalk or a fabric marker, ensuring alignment for an even finish.
Preparing the Fastening Mechanism
Open the fastening mechanism carefully. Align the teeth and tape, checking for any obstructions. If necessary, trim the tape edges to ensure they fit neatly within your fabric edges. Test functionality by sliding the pull along the mechanism to confirm smooth operation.
Step-by-Step Guide to Sew Zipper Overlap Seam
Begin by aligning the edges of the fabric pieces where the fastener will be attached. Ensure a precise fit and pin securely to avoid movement during the process.
Preparation
Choose an appropriate closure length based on your design. Cut the fabric edges with a straight ruler and rotary cutter for a clean finish.
Sewing Process
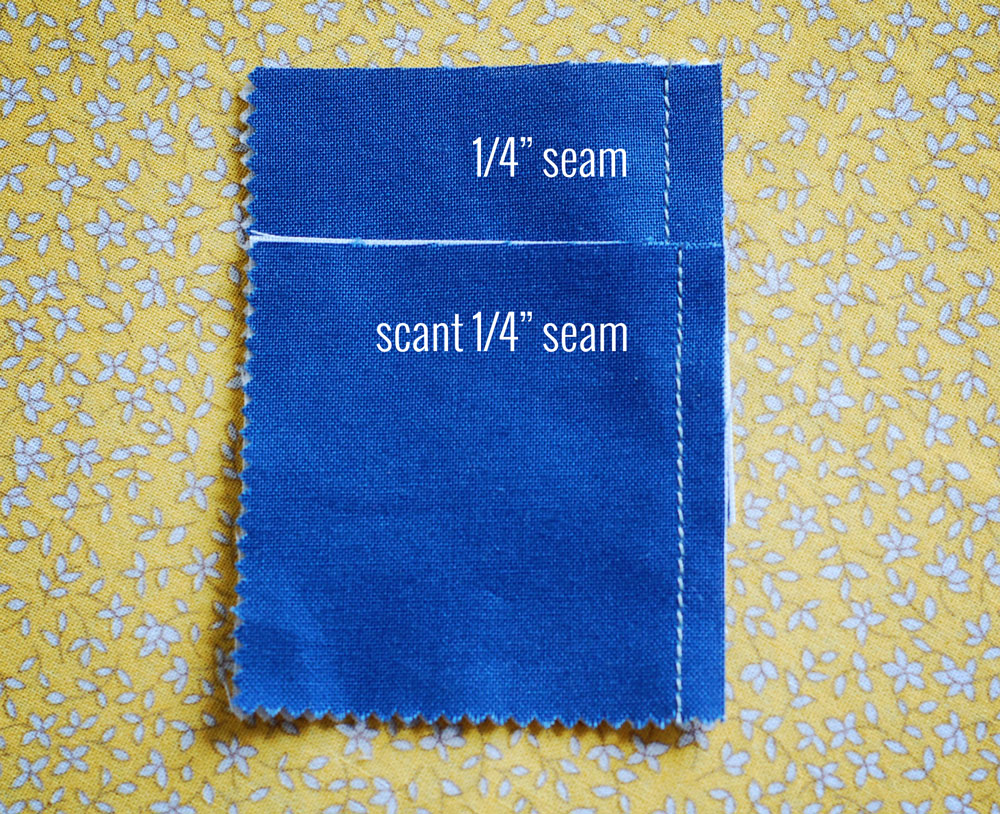
Using a straight stitch, sew along the edge, about 1/4 inch from the fabric’s raw edge. Ensure you backstitch at the beginning and end to secure the seam. Trim any excess fabric to reduce bulk.
Press the seam allowances toward one side. This helps create a crisp edge. Place the fastener over the pressed seam and align the teeth or coils along the seam line.
Pin the fastening in place, making sure it is centered and straight. Stitch along the edges of the fastening, reinforcing the area at the top and bottom for durability.
Fold the top layer of fabric over the fastening, ensuring a smooth appearance. Pin this layer in place, and sew a line about 1/8 inch from the edge to secure the fold down.
Finally, press the area carefully. This completes a neat and professional finish, ensuring functionality and aesthetics.
Finishing Techniques for a Polished Zipper Overlap
Press the seam allowances towards the inside for a clean appearance. This ensures that edges lie flat against the fabric, hiding any irregularities. Use a pressing cloth to protect delicate materials from heat damage.
Topstitch along the edges for added durability and a professional finish. A contrasting thread color can enhance visual appeal, making it a feature rather than a flaw. Ensure stitches are evenly spaced, typically 1/8 to 1/4 inch from the edge.
Consider using a blind hem stitch to secure the interior flap. This creates a seamless look on the outside while keeping the inside neat. Adjust stitch settings on the machine to achieve desired tightness and invisibility.
Incorporate stay tape along the seam line to prevent stretching, especially with heavier fabrics. An additional layer helps maintain shape over time. Cut the tape slightly shorter than the seam to reduce bulk.
Finish raw edges with a serger or zigzag stitch to prevent fraying. This keeps the interior tidy and prolongs the lifespan of the garment. Choose a thread color that matches the fabric for inconspicuous results.
For added security, weigh down the flap with a lightweight interfacing. This stabilizes the area, preventing sagging or misalignment. Apply it during assembly and trim excess material to achieve clean lines.
Common Mistakes to Avoid When Overlapping Zippers
Ensure proper alignment before securing any closures. Misalignment can create unsightly gaps or puckering.
Avoid cutting the fabric too close to the seam allowance. Insufficient fabric can lead to fraying and weaken the structure.
Always reinforce the stress points with additional stitches. This practice prevents potential failures at critical areas.
Do not skip pressing the seams flat after each step. This process keeps the finish neat and helps with alignment.
Check the compatibility of the fabric with the chosen fastener. Incompatibility can result in difficulty during closure operation.
| Mistake | Consequence |
|---|---|
| Misalignment | Gaps or puckering |
| Insufficient seam allowance | Fraying and weakness |
| Neglecting stress points | Failure at critical areas |
| Skipping pressing | Messy finish and misalignment |
| Incompatible materials | Difficulty in closure operation |
Refrain from using a single type of stitch throughout. Mixing different stitch types can enhance durability and aesthetics.
Be cautious with the fabric’s stretch and recovery properties. Overstretching during the process can distort shape and fit.
Don’t choose decorative elements that overwhelm functionality. Balance is key to maintaining a polished appearance.
Maintenance Tips for Zippers in Jumpsuits
Regular cleaning significantly enhances longevity. Use a soft brush to remove dirt or lint trapped in the teeth. For deeper cleaning, dab a damp cloth with mild soap and gently wipe.
Lubrication Techniques
- Apply wax-based lubricant or a specific zipper conditioner to reduce friction. Avoid oil-based products as they can attract more dirt.
- To apply, open the closure halfway, then run the lubricant along the teeth. Operate the slider back and forth to distribute evenly.
Storage Recommendations
- Store garments in a cool, dry place to prevent rust or corrosion of metal components.
- Avoid hanging heavy items on the closure to prevent strain; instead, use hangers that support the entire structure of the item.
Regular inspections help catch issues early. Check for misalignments or damage, and address problems before they worsen.
For stuck sliders, gently pull back the fabric and check for obstructions. If necessary, carefully realign the teeth before attempting to adjust the closure again.
Q&A: Sewing zipper overlap for jumpsuit
How do you install the invisible zipper in a jumpsuit sewing project using a sewing pattern, and what is the role of the invisible zipper foot in this process?
To install the invisible zipper in a jumpsuit sewing project using a sewing pattern, begin by placing your zipper face down along the edge of the jumpsuit fabric with right sides together, matching the notches on the center back or side seam. Use an invisible zipper foot to sew as close as possible to the zipper coil, guiding the needle along the side of the zipper tape while keeping the zipper teeth turned out. The invisible zipper foot helps maintain an even stitch line and ensures the zipper stays flat and nearly invisible from the right side of the garment.
Why is it important to baste the zipper in place before final stitching, and how do you ensure the zipper placement matches between the front and back?
Basting the zipper in place is important because it temporarily secures the zipper to the jumpsuit fabric, allowing you to check that the placement is symmetrical on both sides and that the zipper pull aligns with the seam lines—especially crucial when installing along the center front or back. To ensure the zipper placement matches between the front and back, pin the front and back pieces with right sides together, match the waist seam or notch points, and baste the zipper using a long stitch along the zipper tape before sewing with the invisible zipper foot.
What are the steps to follow when sewing the lower part of the jumpsuit after the zipper is attached, and how do you handle the excess zipper tape?
After the zipper is attached, close the zipper and mark the point just below the zipper stop. Starting at the end of the zipper, sew the lower part of the jumpsuit—either the back or side seam—continuing the seam from the bottom of the zipper to the crotch seam or hem, depending on the jumpsuit pattern. Trim any excess zipper tape and tack it down away from the zipper teeth to prevent bulk. Finish sewing the seam, press it open, and check the zipper application for smoothness and even alignment.
How do you correctly position the front and back pattern pieces onto the fabric for accurate zipper placement, and what role does the guide for the zipper play?
To correctly position the front and back pattern pieces onto the fabric, lay them flat with right sides together, ensuring the center back or side of the front seam is straight and aligned. Use pattern markings and the guide for the zipper included in the sewing tutorial to determine the correct zipper placement. The guide helps measure the zipper length, mark where the top of the zipper teeth begins, and indicate where to start sewing. This ensures the zipper stop sits at the correct location and that both sides of the zipper open evenly across the jumpsuit.
How do you sew an invisible zipper onto the jumpsuit using Closet Core Patterns, and why is it important to work with the zipper open and on the wrong side of the fabric?
To sew an invisible zipper onto the jumpsuit using Closet Core Patterns, start by placing the zipper face down along the edge of the jumpsuit front or back right, with the wrong side of the fabric facing up. Open the zipper and align the zipper tape in place along the seam line, pinning as you go. Sewing with the zipper open allows you to stitch closer to the coil using either an invisible or regular zipper foot, creating a clean, concealed finish on the jumpsuit right side once the zipper is closed.
Why should you use a regular zipper foot if an invisible zipper foot is unavailable, and how do you position the side of the zipper foot correctly?
If an invisible zipper foot is unavailable, you can use a regular zipper foot by positioning the foot so it rides along the side of the zipper coil, allowing the needle to stitch close to the edge of the zipper without hitting the teeth. To do this accurately, pin the zipper to the fabric on either side of the zipper, then adjust your machine so the needle sews within ⅛ inch of the coil, keeping the zipper flat. This method helps create a nearly invisible finish even without a specialized foot.
How do you pin the zipper and sew the front of the jumpsuit for proper alignment, and what role does sewing in place play in zipper security?
To pin the zipper and sew the front of the jumpsuit correctly, begin by aligning the top of the zipper with the front waist seam or top edge of the jumpsuit and mark one inch of the zipper from the top for consistent seam allowance. Pin the zipper tape in place on the wrong side, then sew in place from top to bottom. This sewing in place step anchors the zipper securely and prevents shifting, ensuring both sides of the zipper align evenly when closed.
What does it mean to sew the other side of the zipper, and why is it important to continue sewing the jumpsuit along the front or side seam after installation?
Sewing the other side of the zipper means attaching the opposite tape to the corresponding side of the jumpsuit—typically the back or front—making sure it’s mirrored and evenly aligned with the first side. After both sides of the zipper are installed, it’s essential to continue sewing the jumpsuit along the front or side seam to complete the garment structure. This joins the lower section of the jumpsuit beneath the zipper, reinforces the seam line, and allows the zipper to lay flat and function properly throughout wear.
How do you sew the zipper in a lapped zipper application on the side of the jumpsuit, and what steps ensure the zipper stays hidden when closed?
To sew the zipper in a lapped zipper application on the side of the jumpsuit, start by placing the zipper on the back of the jumpsuit with the right side of the fabric facing up, positioning it slightly off the seam line. Fold the overlap flap from the front of the jumpsuit over the zipper, then topstitch through all layers to create the lap. Keeping the zipper closed while sewing ensures even spacing and allows you to sew the upper portion smoothly. This method, often included in tailors gone wild sewing tutorials, ensures the zipper is concealed under the lap when the garment is worn.
Why is it important to learn how to sew a lapped zipper before you cut your jumpsuit, and how can free patterns support your preparation?
It’s important to learn how to sew a lapped zipper before you cut your jumpsuit because the seam allowance and placement differ from an invisible zipper and need to be accounted for in the sewing pattern. Practicing on a scrap helps you master the overlap technique and determine the correct topstitching distance. Free patterns and tutorials can provide visual step-by-step guides, making it easier to understand zipper positioning and seam construction. Taking the time to sew a test version ensures better accuracy and results in a polished, professional zipper finish.


