Creative Quilt Portfolio Ideas to Showcase Your Unique Quilting Style and Skills
Begin with a thematic approach, selecting a central motif that resonates throughout your collection. This could be a specific color palette or a pattern that ties each piece together, giving viewers a cohesive experience.
Utilize high-quality images that clearly depict the intricacies of your craftsmanship. Consider photographing your pieces in natural light with varied angles to highlight stitching details and fabric textures.
Introduce elements of storytelling within your display. Share personal anecdotes or the inspiration behind each piece to engage your audience on a deeper level. This narrative adds sentimental value and fosters a connection with viewers.
Incorporate functionality by offering detailed descriptions of your techniques and materials used. This transparency not only showcases your skills but also educates your audience, enhancing their appreciation for the art form.
Choosing the Right Fabrics for Your Quilting Portfolio
Select fabrics based on intended mood and theme. For a calm look, opt for muted tones and soft textures. Bright and bold colors create excitement but can overwhelm. Balance between accent and background materials is key; choose one dominant fabric for your main visual and subtle options for supporting layers.
Consider fabric types. Cotton is a classic choice due to its availability and ease of handling, while flannel can add warmth and softness. Look into blends for durability and versatility; a cotton-polyester mix could be useful for projects requiring extra strength.
Texture plays a significant role. Incorporate various weaves like sateen or twill to enhance the depth of the design. Adding different textures can also help guide viewers’ eyes across the piece.
Pay attention to scale; large prints can overpower small spaces, while tiny patterns may get lost on bigger pieces. Keep fabric proportions in mind to maintain harmony in your arrangement.
Plan your color palette effectively. Create a cohesive look by selecting colors that complement each other, utilizing color wheels to find harmonious schemes. Testing swatches alongside each other can reveal combinations that might not work as expected when viewed individually.
Lastly, ensure fabrics are pre-washed where necessary to avoid unexpected shrinkage after assembly. This preparation helps maintain the integrity of your work and preserves the intended appearance. Consider the usability of each piece and how they interact when finished, as this will enhance the overall success of your creations.
Organizing Your Quilt Projects for Easy Access
Utilize clear plastic bins to store materials for each creation. Label each bin with the project name and contents to avoid confusion.
Implement a dedicated binder with plastic sleeves for patterns and designs. This keeps them safe and easily retrievable, while also providing a reference for future use.
Create a visual board for inspiration and planning. Attach swatches and draft layouts to a corkboard or magnetic board, allowing for quick adjustments and easy viewing of ideas.
- Incorporate a project timeline. Use a calendar or planner to track deadlines and milestones for each piece.
- Establish a designated workspace. Ensure all necessary tools and equipment are neatly stored and ready for immediate access.
- Implement a journal or logbook to document progress, challenges, and solutions encountered during the work.
Sort fabrics by color, type, or theme in separate drawers or shelves. This allows for quick selection and minimizes the time spent searching for materials.
- Review completed works regularly to assess and decide on potential future projects or alterations.
- Engage in regular decluttering sessions to remove unused materials and keep the workspace efficient.
Establish a digital filing system for patterns and tutorials. Use folders to categorize by style or complexity, facilitating ease of access from any device.
Incorporate a buddy system. Share project goals with a friend or fellow enthusiast to stay accountable and motivated.
Incorporating Personal Touches into Your Quilt Designs
Choose fabrics that hold sentimental value. Pieces from old clothing or family heirlooms can narrate personal stories, making each section meaningful.
Integrate meaningful symbols or motifs. These can represent milestones, hobbies, or family traditions, ensuring that your craft reflects your individuality.
Utilize Unique Color Palettes
Experiment with colors that resonate with you. Select shades that evoke memories or emotions, whether they come from nature, art, or personal experiences.
Add Textured Elements
Incorporate a variety of materials such as lace, denim, or velvet. These layers not only provide depth but also invite tactile engagement that speaks to your personal aesthetics.
Documenting Your Quilting Process: Tips and Techniques
Capture each stage using a dedicated notebook or digital app. Take detailed notes on fabric choices, stitching techniques, and design alterations. Consistent documentation will help track your evolution as a creator.
Photography
Incorporate high-quality images at key points–before starting, mid-process, and after completion. Use natural lighting and avoid cluttered backgrounds. Consider close-ups of intricate stitching or unique fabric patterns to showcase craftsmanship.
Video Documentation
Create short clips while working. Share your thought process, design decisions, and any challenges faced. This visual narrative offers insights for both yourself and others. Use simple editing tools to compile these snippets for future reference or sharing.
Creating a Visual Story Through Your Quilting Portfolio
Focus on a cohesive theme that ties your pieces together. This can enhance the narrative, making it more engaging. Choose colors or patterns that resonate throughout your works to create visual harmony.
Incorporate Personal Narratives
Include brief stories behind each piece, explaining the inspiration or emotions driving your designs. Sharing these insights helps viewers connect with your collection on a deeper level, enriching their experience and understanding of your art.
Showcase Progression
Document your development over time. Include images of earlier works alongside current creations to illustrate your growth and evolving style. This not only highlights your journey but also captivates viewers by showcasing the evolution of your technique and creativity.
Utilize high-quality photography. Ensure your images are sharp and well-lit, allowing the details and textures of your fabrics to shine. Consider various angles and close-ups to highlight intricate work.
Organize the layout meaningfully. Arrange your pieces in a sequence that tells a story or follows a theme. This organization guides the viewer’s eye and leads them through your visual narrative seamlessly.
Engage with mixed media. If applicable, combine textiles with other artistic elements such as drawings or photographs. This adds depth and interest, allowing for a more dynamic presentation of your work.
Lastly, consider creating a digital showcase or a physical album. Each format offers unique advantages, but both should reflect the quality and essence of your artistic voice. Choose whichever best serves your narrative.
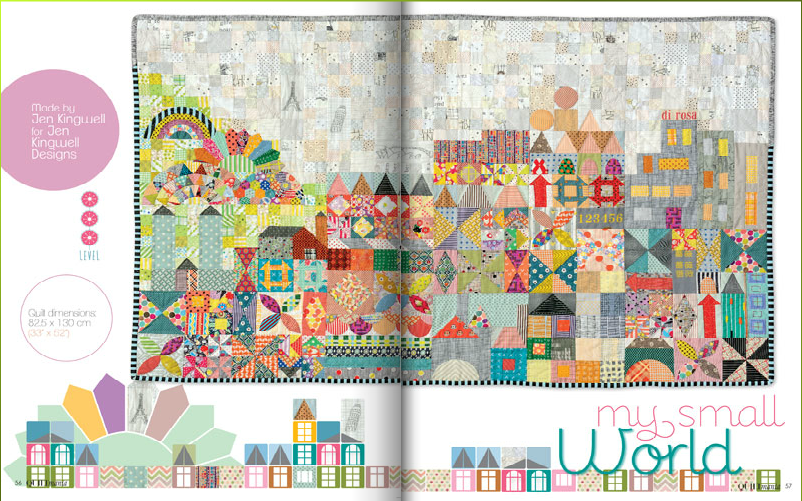
Showcasing Completed Quilts: Presentation Ideas
Utilize natural light to enhance colors and textures while photographing finished pieces. Position your work near a large window during daylight, avoiding direct sunlight to prevent harsh shadows.
Create a themed display area using complementary decor. Incorporate elements that align with the color palette or motif of the piece, such as vintage furniture or accessories that highlight the craftsmanship.
Capture close-up shots of intricate stitching and fabric details. Use a macro lens to reveal texture differences and the artistry involved in every element.
Fabric hanging displays can draw attention. Use dowels or decorative rods to suspend pieces from walls or ceilings, presenting them in a three-dimensional manner that invites closer examination.
Document the evolution of each piece with a photo series. Take images at various stages, from initial design sketches to completed installations, illustrating the creative process.
Incorporate a storytelling element by including personal anecdotes or historical background about the materials and inspiration behind the piece. Place these narratives alongside the display to engage viewers more deeply.
Host an interactive exhibition event where attendees can vote for their favorite works. This not only encourages participation but also fosters a sense of community around the craft.
Consider creating a digital slideshow or video montage featuring aspects of the making process, finished pieces, and viewer reactions to enrich the overall presentation.
Arrange finished works to create a flow that guides viewers through designs. Curate the placement to allow a visual journey, ensuring each piece complements the next.
Collaborate with local businesses or galleries for shared exhibition space, expanding the audience while offering a fresh backdrop for your creations to shine.
Use handmade labels or tags for each piece, detailing techniques employed and unique aspects. This adds an element of authenticity and invites deeper appreciation for the craftsmanship.
Q&A: Quilt portfolio ideas
How can creating an art quilt help quilters explore unconventional quilt blocks and inspire new patchwork designs?
Creating an art quilt allows quilters to move beyond traditional quilt blocks and experiment with shape, color, and thread techniques. Unlike standard patterns, an art quilt encourages exploration of abstract layouts or landscape imagery. This creative freedom inspires new patchwork designs and helps quilters develop their own style through unique compositions and unexpected combinations of fabric and scrap.
Why do quilters use fusible materials and dye techniques when constructing an art quilt with complex shapes?
Fusible materials help stabilize intricate fabric shapes, allowing them to be arranged and sewn onto the quilt surface more easily. Combined with hand or machine dye techniques, quilters can achieve subtle color transitions and depth, particularly in landscape-themed art quilts. This combination gives the quilter more control over design elements and enables layering without bulk at the edge of the quilt.
What makes art quilt posts in online quilt communities a popular category for inspiration and creative sharing?
Art quilt posts are a popular category because they showcase innovative techniques, experimental blocks, and expressive uses of fabric and thread. These posts often inspire fellow quilters to try new styles or materials, like fusible web or painted fabrics. Sharing online also creates space for feedback, encouragement, and the publishing of tutorials or work-in-progress photos to educate and connect with others.
How do machine techniques enhance the texture and visual impact of an art quilt?
Machine techniques such as free-motion stitching or thread painting add texture and dimension to an art quilt. The ability to sew detailed lines, define shapes, or mimic natural elements like grass or water enhances the visual impact, especially in abstract or landscape designs. Using the machine creatively transforms the quilt surface into a dynamic canvas full of motion and depth.
What role does scrap fabric play in shaping the design of an art quilt?
Scrap fabric provides variety in color, texture, and scale, which is essential in building the layered look of an art quilt. Quilters often use small bits of scrap to create new shapes, blend edges, or emphasize key areas of the design. Incorporating scraps adds spontaneity to the process and allows quilters to work sustainably while enhancing the expressive nature of the piece.
Why do some quilters choose to publish their art quilts or quilt blocks as part of a digital post or exhibit category?
Quilters publish their art quilts or detailed quilt blocks online to share their creative process, inspire others, and gain recognition within the quilting community. Posting in a specific category like art quilt or patchwork allows others to explore ideas, techniques, and materials used in the project. It also serves as an archive of their work and contributes to the broader conversation about quilting as both craft and art.