Sewing Inset Center Panel for Charlie Caftan Easy Guide
Elevate your fashion creations by adding a distinct design feature that not only enhances the aesthetics but also provides a unique touch to your garments. This technique allows you to incorporate an intriguing visual element, transforming a simple piece into something remarkable and personalized. Whether you’re a novice or an experienced artisan, this method can be adapted to suit your skill level and design aspirations.
In this discussion, we will delve into the steps required to integrate this sophisticated addition seamlessly into your project. By following a few straightforward instructions, you can achieve a professional look that showcases your creativity and attention to detail. Prepare to explore the possibilities that this style offers, allowing your wardrobe to reflect your individuality and taste.
Embrace the joy of crafting as you embark on this innovative journey. With just a few materials and a bit of patience, you’ll be well on your way to enhancing your creations with this captivating approach. Unleash your inner designer and discover how this simple technique can make a significant impact on your overall style.
Understanding the Charlie Caftan Design
The allure of this stylish garment lies in its effortless elegance and versatility, making it a beloved choice for various occasions. Its flowing silhouette provides both comfort and a touch of sophistication, suitable for casual outings or more formal events. This design captures attention with its unique structure, enhancing the overall aesthetic while allowing for creative expressions through fabric choices and patterns.
Key Features
At the heart of this design are several notable characteristics that contribute to its charm. Below is a table outlining these features and their significance:
| Feature | Description |
|---|---|
| Silhouette | A loose, flowing shape that flatters all body types. |
| Neckline | Varieties from V-cut to round, allowing for personalization. |
| Fabric Options | Works beautifully with a range of materials, from light cotton to luxurious silk. |
| Length Variations | Available in different lengths, providing adaptable styles for different seasons and occasions. |
Styling Possibilities
This garment can be styled in numerous ways, accommodating both casual and chic ensembles. Pairing it with accessories, such as belts or statement jewelry, can dramatically alter its look. The choice of fabric color and pattern also plays a crucial role, resulting in countless possibilities for individual expression.
Materials Needed for Your Project
To successfully complete your endeavor, having the right materials at hand is essential. Each item plays a crucial role in ensuring that everything goes smoothly and achieves the desired outcome. Below is a comprehensive list of necessities that will support your creative process.
Essential Supplies
- Fabric of your choice
- Thread that complements your fabric
- Scissors for cutting
- Pins to secure layers
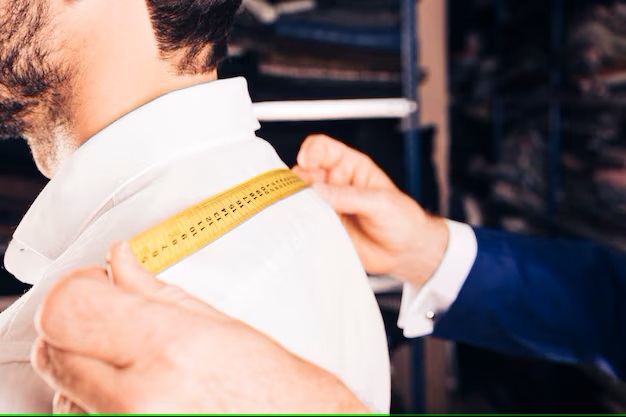
- Measuring tape for accurate dimensions
Additional Tools and Accessories
- Iron for pressing seams
- Seam ripper for correcting mistakes
- Rotary cutter for precise edges
- Cutting mat to protect surfaces
- Pattern instructions for guidance
Gathering these components beforehand will set a solid foundation for your project and enhance your crafting experience.
Step-by-Step Sewing Instructions
This section provides a clear outline for incorporating a detailed section into your garment. Following these instructions meticulously will ensure a polished finish and a professional look. Each step is designed to guide you through the process with ease, allowing you to create a stunning addition to your attire.
| Step | Description |
|---|---|
| 1 | Prepare your fabric pieces by cutting them according to the specified dimensions. Ensure all edges are neat and accurate. |
| 2 | Align the chosen section with the main fabric, making sure to center it properly. Pin it in place to avoid any shifting during the next steps. |
| 3 | Using the appropriate stitch type, begin attaching the added section to the main piece, starting from one edge and working your way across. |
| 4 | After stitching, carefully trim any excess fabric to reduce bulk. This will help maintain a sleek silhouette. |
| 5 | Press the seams gently with an iron to ensure everything lies flat, creating a seamless look between the two elements. |
| 6 | Finish the edges as necessary, whether through serging or zig-zag stitching, to prevent fraying and enhance durability. |
| 7 | Check the alignment and make any adjustments before proceeding with assembling the remainder of your garment. |
By adhering to this structured approach, you will achieve a beautifully integrated section that elevates your creative project.
Tips for Achieving a Perfect Fit
Ensuring that your garment fits impeccably enhances not only comfort but also your overall appearance. Here are several techniques to help you attain that flawless fit you desire.
- Take Accurate Measurements: Start by measuring key areas such as chest, waist, hips, and inseam. Use a flexible measuring tape and have someone assist you for the most precise results.
- Choose the Right Size: Always refer to the size chart provided by the pattern. If your measurements fall between sizes, consider going for the larger option for a more comfortable fit.
- Make a Muslin Prototype: Create a practice version of your design using inexpensive fabric. This allows you to identify any adjustments needed before cutting into your chosen material.
- Adjust Fit During Construction: As you put your piece together, try it on frequently. This helps you see how it drapes on your body and where modifications might be necessary.
- Incorporate Design Elements: Consider adding darts or tucks in specific areas to achieve a more contoured shape. These small details can vastly improve the overall fit.
- Pay Attention to Ease: Determine the ease you require based on the style you’re creating. Aim for a balance between snug and loose, depending on your personal preference.
- Consult Online Resources: Don’t hesitate to seek out tutorials and videos that address fitting issues. Many experienced creators share valuable advice and solutions.
By following these straightforward pointers, you can elevate your creation to a level that not only looks tailored but also feels good to wear.
Common Mistakes to Avoid
When embarking on a creative project involving fabric manipulation, it’s essential to be aware of frequent pitfalls that can lead to frustration and unsatisfactory results. Having knowledge of these errors allows you to approach your work with greater confidence and precision.
One of the primary issues that many encounter is inaccurate measurements. Failing to measure correctly can result in pieces that do not fit together properly, leading to wasted material and time. Always double-check your dimensions before cutting.
Another common error is neglecting to consider the grain of the fabric. Cutting pieces in the wrong direction can affect the drape and overall appearance of the final product. Make sure to align your pattern according to the fabric’s grain for the best outcome.
Improper preparation of your materials can also result in complications. Skipping steps like pre-washing or pressing fabric can affect the integrity and finish of your work. Always take the time to ready your materials before you begin.
Lastly, many tend to overlook the importance of practice and patience. Rushing through the process can lead to careless mistakes, which are often easily avoidable with a more measured approach. Embrace the journey and allow yourself the space to learn and grow.
Finishing Touches for a Professional Look
Final details can elevate your handmade garment from basic to exceptional. These finishing elements not only enhance the overall appearance but also add durability and a sense of completeness to your creation. Paying attention to the small aspects transforms your work into a polished masterpiece.
Start by ensuring all raw edges are neatly finished. Techniques like zigzag stitching, serging, or binding can prevent fraying and give a clean look. Ironing your seams flat also makes a significant difference; pressing the fabric helps maintain the garment’s shape and structure.
Lastly, consider embellishments like topstitching, decorative buttons, or trims that complement your design. These details can provide a personal touch, making your piece truly unique.
| Detail | Description |
|---|---|
| Edge Finishing | Use methods such as serging or binding to prevent fraying. |
| Pressing Seams | Ironing seams flat ensures a tidy appearance and enhances shape. |
| Embellishments | Consider adding unique touches like decorative stitching or buttons. |
Q&A: Sewing inset center panel charlie caftan
What materials do I need to sew an inset center panel for the Charlie Caftan?
To sew an inset center panel for the Charlie Caftan, you will need the following materials: fabric (preferably lightweight and drapey), matching thread, a sewing machine, scissors, pins, a ruler or measuring tape, and a rotary cutter if desired. Additionally, having an iron on hand to press seams will help achieve a polished finish.
Can you explain the steps involved in creating an inset center panel for the Charlie Caftan?
Creating an inset center panel involves several key steps. First, cut the fabric according to the pattern dimensions provided for the Charlie Caftan. Next, you will need to mark the placement for the inset panel on the main fabric pieces. Once marked, sew the inset panel into place using a straight stitch, making sure to align the edges properly. After sewing, carefully trim any excess fabric and press the seams to lay them flat. Finally, finish the remaining seams as directed by the pattern to complete your caftan.
How can I ensure the inset center panel fits perfectly?
To ensure that the inset center panel fits perfectly, it’s crucial to take accurate measurements and cut the fabric precisely according to the pattern’s specifications. Pre-washing your fabric can also help to eliminate any potential shrinkage. When pinning the inset panel in place, make sure to align the edges evenly and check for any gaping or puckering before sewing. If possible, baste the panel first as a temporary hold before doing the final sewing to see how it fits and make any necessary adjustments.
Are there any tips for sewing curves when attaching the inset panel?
Sewing curves can be a bit tricky, but with some tips, you can achieve a beautiful finish. When sewing around curves, it’s important to go slowly and use a shorter stitch length for better control. Use plenty of pins to secure the fabric and prevent shifting. You can also clip the seam allowance at intervals along the curve to ease the fabric and help it lay smoother. Remember to press the curve gently after sewing, using a tailor’s ham or a rounded surface to help shape the fabric without stretching it out.
What should I do if I make a mistake while sewing the inset center panel?
If you make a mistake while sewing the inset center panel, stay calm and assess the issue. If the misalignment is minor, you can often just unpick the stitches and resew the panel correctly. For more significant errors, consider if you need to cut a new piece of fabric or if the mistake can be fixed with a creative adjustment. Remember that seam ripper is your best friend in these situations! Always press the seams after making repairs, and take your time to carefully finish the project.
What features make the Charlie Caftan pattern by Closet Core a great option for warm weather?
The Charlie Caftan pattern by Closet Core is an excellent option for warm weather due to its modern and architectural design, featuring striking pleats beneath the bust and a deep V neckline. This pattern offers roomy options with dolman sleeves and includes versions that feature a gently gathered bodice, making it comfortable and airy. The inclusion of side slits and optional waist ties allows for a figure-skimming silhouette, perfect for staying cool while looking stylish. Additionally, the choice of fabrics like linen, chambray, and rayon challis enhances its suitability for warm climates.
How does the Charlie Caftan pattern accommodate different skill levels in sewing?
The Charlie Caftan pattern is designed to cater to various skill levels, making it accessible for advanced beginners as well as more experienced sewists. The pattern comes with detailed instructions, and while there are some challenging steps to sew, such as the inset center panel and striking pleats, it provides opportunities for skill development. The inclusion of tutorials, along with options for hand sewing, allows sewists to take their time and learn at their own pace. Additionally, the pattern features free resources that help guide users through the process, ensuring a successful sewing experience.
What customization options are available with the Charlie Caftan pattern?
The Charlie Caftan pattern offers several customization options that allow sewists to personalize their garment. Users may choose between a dramatically wide sleeve or short dolman sleeves, as well as the length of the skirt, which can be tailored to fit individual preferences. The bodice can feature a waist tie for a figure-skimming silhouette or remain untied for a more relaxed fit. Additionally, sewists can select fabrics like crepe, batiste, and voile, which can change the overall look and feel of the garment. The pattern also allows for the choice of different sizes, accommodating a range of body types.
How do the design elements of the Charlie Caftan pattern enhance its aesthetic appeal?
The design elements of the Charlie Caftan pattern significantly enhance its aesthetic appeal by combining modern and architectural aspects with romantic touches. The striking pleats beneath the bust create visual interest and dimension, while the deep V neckline adds an elegant touch. The gently gathered bodice, combined with optional waist ties, allows for a flattering fit that accentuates the waist. The use of high-quality fabrics, such as linen and rayon challis, not only adds to the visual appeal but also contributes to the garment’s comfort and drape, making it a beautiful addition to any wardrobe.
What should I consider when selecting fabric for the Charlie Caftan pattern?
When selecting fabric for the Charlie Caftan pattern, it’s essential to consider the drape and breathability of the material, especially since this is a warm weather staple. Fabrics like linen, rayon challis, and crepe de chine are ideal choices due to their lightweight and airy qualities. Additionally, opting for fabrics with a bit of structure, such as chambray or batiste, can enhance the design elements like pleats and gathers. Consider the pattern’s features, such as the deep V neckline and optional waist ties, and choose a fabric that complements your style while being comfortable to wear.
What is the Charlie Caftan by Closet case, and how does it differ from other patterns?
The Charlie Caftan by Closet case is a modern and architectural sewing pattern that features a deep V neckline and striking pleats beneath the bodice panel. This pattern offers a fresh take on warm weather attire, making it a stylish choice for summer.
What variations are available in the Charlie Caftan pattern?
The Charlie Caftan pattern has multiple views: view A is modern with an inset center panel and roomy pockets, while other versions feature a deeper cut for more coverage. You may also choose between a dramatically gathered bodice with an optional waist tie, allowing for a figure-skimming silhouette in two skirt lengths.
What materials are recommended for sewing the Charlie Caftan?
For the Charlie Caftan, recommended fabrics include viscose, tencel, and chiffon. These materials provide a light and flowy drape, ideal for the comfortable and relaxed fit of this caftan.
How can I ensure the fit of my Charlie Caftan?
To ensure a good fit, take accurate measurements and select the size based on the size chart provided in the sewing pattern. For instance, if your measurements fall between size 12 and size 14, it may be beneficial to sew a muslin sample first to test the fit before using your final fabric.
What is the most challenging step when sewing the Charlie Caftan?
Probably the most challenging step in sewing this pattern is attaching the bodice panel to the bodice. It requires careful alignment and precision to ensure that the architectural details, like the striking pleats, are executed correctly.
Can I modify the pattern to have a different neckline?
Yes, the Charlie Caftan pattern is versatile, and while it features a deep V neckline, you may also choose to modify the neckline to suit your personal style. You can create a more traditional neckline or adjust it to be higher cut for more coverage.
What is the best way to press the seams when constructing the Charlie Caftan?
Start by pressing the seam allowances around the perimeter of your completed bodice. For neat finishes, it’s recommended to press seams open and then press along the stitch line to ensure a crisp edge.
Are there any free patterns available that complement the Charlie Caftan?
Yes, there are several free patterns available that can complement the Charlie Caftan. You may find patterns for accessories or layering garments that can enhance the overall look of your romantic dress.
How should I prepare the fabric before cutting out the pattern pieces?
Before cutting out the fabric for the Charlie Caftan, wash and dry it according to the fabric care instructions. Pressing the fabric and ensuring it is free of wrinkles will help you accurately lay out the pattern pieces and achieve precise cuts.
What tips do you have for assembling the Charlie Caftan?
When assembling the Charlie Caftan, pin along the sides together and sew along the side seams, taking care to align the edges accurately. For any panel piece, especially the interfaced panel, ensure that you use a safety pin to secure the layers and prevent shifting during stitching.