Master Indigo Shibori Dyeing Techniques with Our Comprehensive Tutorial
Transforming fabric through artistic practices has been cherished for centuries, creating vibrant patterns and textures. This ancient craft allows individuals to express creativity while exploring the interplay of color and form. Embrace the joy of finding your unique style as you delve into this captivating journey.
In this guide, you will uncover various methods to beautifully manipulate textiles, resulting in intricate designs that resonate with personal flair. Attaining proficiency in these cherished crafts not only connects you to tradition but also opens the door to endless possibilities in your creative endeavors.
Whether you’re a novice or looking to refine your existing skills, engaging with these practices invites inspiration and innovation. Unlock secrets that will enhance your understanding of fabric artistry, leading to exquisite creations that tell your story.
Understanding the Art of Indigo Shibori
This exquisite craft combines intricate folding, binding, and stitching to create stunning patterns on fabric. Its rich history and cultural significance contribute to its allure, making it a favorite among textile enthusiasts. The beauty of this method lies not only in the final product but also in the process, which invites creativity and personal expression.
Here are some key elements that define the essence of this unique practice:
- Historical Roots: Originating from ancient traditions, this craft has been cherished across various cultures, each adding its own touch and significance.
- Creative Expression: Engaging in this art form allows artisans to explore their imagination, experimenting with different patterns and designs.
- Textile Transformation: The process involves intricate techniques that transform plain materials into visually striking pieces, elevating everyday fabrics into works of art.
- Connection to Nature: Utilizing natural pigments in this craft fosters a deeper relationship with the environment and the materials used.
As you delve into this captivating world, you’ll discover the beauty of the craft and its ability to blend tradition with innovation, inviting you to explore your own artistic journey.
Essential Materials for Dyeing Process
To embark on a journey into the world of fabric coloring, it’s crucial to gather the right supplies. A well-chosen assortment of items not only ensures success but also enhances the overall experience. Below is a list of necessary elements that will facilitate the artistic process.
- Fabrics: Choose natural fibers like cotton, linen, or silk for the best results.
- Dye: Select an appropriate coloring agent, ensuring it is suitable for the chosen material.
- Water: Clean, preferably distilled, water is essential for mixing and preparing the dye.
- Salt or Fixative: These substances help to set the color and improve longevity.
- Gloves: Protect your hands from staining with a good pair of disposable gloves.
- Apron: Wear an apron or old clothing to avoid unwanted marks on your attire.
- Containers: Use non-reactive bowls or buckets to mix and hold the dye.
- Stirring Utensils: Wooden or plastic sticks are ideal for stirring dye solutions safely.
- Measuring Tools: Accurate measuring cups and spoons are necessary for precise dye mixing.
- Rubber Bands or Twine: These can be utilized for binding and creating patterns on the fabric.
By assembling these fundamental items, you will be well-prepared to create stunning works of art on fabric. Each material plays a significant role in achieving the desired outcomes, making them indispensable for your creative exploration.
Step-by-Step Shibori Techniques Explained
This section delves into the fascinating world of fabric manipulation and color application. By following a series of structured methods, you can transform plain cloth into stunning pieces of art. Each approach offers unique patterns and results, allowing for endless creativity and self-expression.
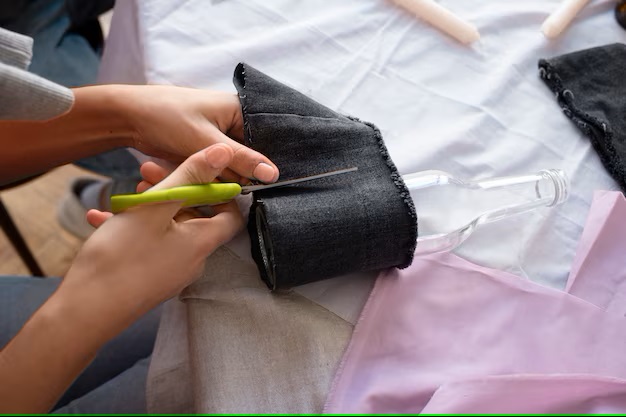
1. The Folding Method: Begin by folding your fabric in a series of pleats or accordion-like structures. Secure it tightly with string or rubber bands. This technique creates beautiful lines and shapes, enhancing the overall visual effect once the color is introduced.
2. The Stitching Technique: Utilize a needle and thread to create intricate patterns by stitching designs onto your fabric. Pulling the threads tight will gather the material, resulting in unique textures when immersed in pigment. This method requires patience and precision for the best outcomes.
3. The Binding Process: Similar to the folding method, this approach involves wrapping fabric around objects or tying it with cords. The areas that remain untouched will retain the original color, creating striking contrast when dyed. This technique encourages experimentation with various shapes and sizes of binding materials.
4. The Resisting Approach: This technique utilizes substances that resist color, such as wax or glue. By applying these materials to specific areas of the fabric, you create a barrier that prevents the color from penetrating, resulting in distinct patterns. This method can be combined with other approaches for even more intricate designs.
By exploring these various fabric manipulation methods, you can unleash your creativity and produce breathtaking textile art. Each process offers a different way to express your artistic vision, making every piece truly one-of-a-kind.
Color Theory: Mastering Indigo Shades
Understanding the essence of various tones can profoundly enhance your creative endeavors. The interplay of hues, along with their emotional and aesthetic impacts, is essential for anyone looking to elevate their artistry. This section delves into the captivating world of blue shades, guiding you to create harmonious blends and nuanced palettes.
Exploring the Spectrum
The range of blue offered in your projects can vary significantly. To effectively navigate this spectrum, consider the following elements:
- Base Tones: The foundation of your color choices will dictate the final appearance.
- Undertones: These subtle hints can shift the perception of the main hue.
- Lighting Conditions: The environment where the colors are observed can alter their appearance dramatically.
Creating Depth and Dimension
Incorporating a variety of shades can add richness to your work. Consider these strategies:
- Experiment with layering: Combine different shades to produce a unique effect.
- Utilize gradients: Transitioning from lighter to darker tones can create a sense of movement.
- Balance warm and cool tones: Mixing elements from both ends of the spectrum can yield engaging contrasts.
By focusing on these aspects of color, you can cultivate a deeper understanding of how to evoke emotion and convey messages in your creations. This knowledge will serve as a valuable asset in your artistic pursuits.
Common Mistakes to Avoid in Dyeing
When embarking on a journey into the world of fabric coloration, it’s essential to be aware of potential missteps that can compromise your results. Understanding these pitfalls can save time, resources, and frustration, leading to more satisfying outcomes in your creative endeavors.
Improper Fabric Preparation
One of the key factors for achieving vibrant hues is the proper preparation of your material. Failing to wash and pre-treat the fabric can result in uneven absorption. Residues from manufacturing processes, like sizing or chemicals, can interfere with the coloration, leaving you with disappointing results. Always ensure your fabric is clean before starting any process.
Ignoring Temperature and Timing
Temperature plays a crucial role in the adherence of color particles to the fibers. Overheating or underheating your dye bath can lead to less than ideal saturation. Additionally, timing is fundamental; not allowing enough time for the fabric to soak in the solution can result in faded shades. Always monitor these parameters carefully to ensure optimal results.
Creative Projects to Showcase Your Skills
Once you have developed your abilities in fabric manipulation and color application, it’s time to put your creativity to the test. Engaging in various projects not only allows you to demonstrate your newfound expertise but also enhances your portfolio. Here are some innovative ideas to inspire your next creations.
Home Decor Items
Transform your living space with unique pieces made by your own hands. Consider these options:
- Throw pillows: Create one-of-a-kind designs that add character to your couch.
- Table runners: Design elegant runners to impress guests during dinner parties.
- Wall art: Frame your dyed fabrics for stunning wall displays.
Wearable Art
Make a statement with clothing and accessories that reflect your artistic flair. Options include:
- Scarves: Craft beautiful scarves that showcase your mastery of color gradients.
- Tote bags: Design functional yet stylish bags perfect for everyday use.
- Garments: Experiment with unique clothing pieces that stand out and tell a story.
Q&A: Indigo shibori dyeing techniques tutorial
What is Shibori dyeing, and how does it differ from regular dyeing methods?
Shibori is an ancient Japanese technique of dyeing fabric that involves binding, folding, twisting, or bunching to create intricate patterns before the fabric is submerged in dye. Unlike conventional dyeing methods, which typically involve immersing the entire fabric uniformly in color, Shibori allows for deliberate manipulation of the fabric to achieve unique designs. The processes used in Shibori create beautiful resist patterns where the dye cannot penetrate, resulting in striking visual effects that are both random and structured.
Can you explain the materials needed for Indigo Shibori dyeing and their significance?
To start with Indigo Shibori dyeing, you’ll need a few essential materials: natural or synthetic indigo dye, a chosen fabric (cotton or silk works well), rubber bands or strings for binding, gloves to protect your hands, and a dye vat which can either be pre-prepared or made on your own. Each material serves a specific purpose: the dye is the star of the process, providing the rich blue colors, while the binding materials create the pattern you desire by resisting the dye. Proper preparation and understanding of each component are crucial for achieving the best results in your dyeing projects.
What are some common Shibori techniques that beginners can try out?
Beginners looking to dive into Shibori dyeing can start with a few approachable techniques like Arashi (pole wrapping), Kumo (spider), and Itajime (clamp resist). Arashi involves wrapping fabric around a pole and binding it tightly with string before dyeing, resulting in diagonal patterns. Kumo creates a spider web effect by gathering and binding fabric at various points, which produces organic, flowing shapes. Itajime uses wooden blocks to create geometric resist patterns, allowing for clean lines and defined shapes. With these techniques, beginners can experiment and create beautiful designs without feeling overwhelmed.
How can I ensure that my Indigo Shibori dyeing results are consistent and vibrant?
Achieving consistent and vibrant results in Indigo Shibori dyeing involves several key practices. Firstly, ensure that your fabric is pre-soaked in a water and mordant solution, as this helps the dye adhere better. Secondly, maintain the proper dye vat temperature and pH levels, as these factors can significantly affect the color uptake. Thirdly, allow sufficient time for the fabric to be immersed in the dye, checking the progress periodically. Lastly, remember to rinse and wash the fabric properly after dyeing to eliminate excess dye, ensuring a clean finish. By following these steps carefully, you can enhance the quality and consistency of your Shibori dyeing projects.
What are the basic steps to create tie-dye with an indigo dye kit?
To create tie-dye using an indigo dye kit, begin by dissolving the soda ash in warm water and soaking the fabric before dyeing. Prepare the indigo vat by mixing pre-reduced indigo with water and sodium hydrosulfite. Use accordion folding techniques or binding techniques like shibori indigo dyeing for unique patterns. Once folded, dip the fabric into the indigo vat and let it oxidize. After each dip, let the fabric turn blue as it comes out of the dye. Repeat the process until you achieve the desired shade of deep blue.
How can shibori indigo dyeing create beautiful patterns on fabric?
Shibori indigo dyeing relies on resist dyeing techniques, where fabric is folded or bound to create patterns. By using methods like the accordion fold or binding the fabric with string or rubber bands, specific areas resist the dye, resulting in beautiful patterns. Once the fabric is dipped into the indigo vat and oxidized, these patterns emerge as vibrant contrasts of deep blue and white, creating stunning designs typical of traditional Japanese tie-dye methods.
What is the best way to prepare fabric before dyeing with an indigo dye kit?
Before dyeing, the fabric should be soaked in a soda ash solution, which helps the fabric take the dye better. Let it sit in the solution for about 20 minutes, then wring it out before folding or binding it using shibori techniques. Preparing the fabric properly ensures that it takes on a rich, deep blue shade once dipped into the indigo dye vat.
How does natural indigo dye create deep blue shades in fabrics?
Natural indigo dye creates deep blue shades through a process of oxidation. When fabric is dipped into the indigo vat, it initially turns green. As the fabric is exposed to air, the indigo begins to oxidize and turns blue. Repeating the dipping and oxidation process multiple times allows the fabric to reach a deeper, more intense shade of blue, depending on the technique and the number of dips.
What materials are essential for a successful shibori indigo dye session?
For a successful shibori indigo dye session, essential materials include an indigo dye kit, soda ash, latex gloves, a dust mask for safety, and warm water for preparing the vat. You’ll also need items for folding and binding the fabric, such as rubber bands or string, and a bucket of clean water for rinsing the fabric once the dyeing is complete. The binding techniques help create resist patterns, while the gloves protect your hands from staining during the dyeing process.
How do folding techniques like the accordion fold influence the final tie-dye pattern?
Folding techniques such as the accordion fold create distinctive, linear patterns on fabric during tie-dyeing. When fabric is folded in long strips and bound tightly, the folded areas resist the dye, creating geometric, repeating designs. After dyeing, the parts that were tightly folded or bound will remain lighter, resulting in contrast with the dyed sections, giving a sharp, clean pattern.
What role does soda ash play in the tie-dyeing process?
Soda ash is essential in the tie-dyeing process as it helps the fabric absorb the dye more effectively. By soaking the fabric in a soda ash solution before dyeing, the fibers open up, allowing the indigo or any dye to penetrate deeply, resulting in brighter, longer-lasting colors. Skipping this step may lead to uneven or pale dye results.
How do you know when the dyeing process is complete in shibori indigo dyeing?
The dyeing process is complete when the fabric has oxidized to a shade of blue you’re satisfied with. After dipping the fabric into the indigo vat and allowing it to oxidize in the air, rinse the fabric in clean water until the water runs clear. If the fabric reaches the desired shade of deep blue, the process is finished; otherwise, you can re-dip the fabric for a darker hue.
What are the key safety measures to follow during a DIY indigo tie-dye session?
During a DIY indigo tie-dye session, safety measures include wearing latex gloves to protect your hands from dye, using a dust mask when working with soda ash and powdered indigo to avoid inhalation, and working in a well-ventilated area. Additionally, use clean water to rinse your fabric and ensure all dyeing tools are properly cleaned after use to avoid contamination.
What is the difference between using natural indigo and synthetic dyes for tie-dyeing?
Natural indigo dye, derived from plants, requires oxidation to turn blue, creating a unique, earthy shade. Synthetic dyes, while often easier to use, don’t undergo the same oxidation process and may provide more predictable, vibrant colors. Natural indigo dye results in a deeper, more traditional shade of indigo that evolves with each dip, whereas synthetic dyes may provide quicker results but lack the traditional feel of indigo tie-dye.
How do you create indigo tie dye patterns using diy shibori techniques?
To create indigo tie dye patterns with diy shibori, you start by folding the fabric using traditional Japanese folding and tying techniques like accordion or pleating methods. Next, dip the folded fabric into the indigo dye vat. After each dip, let the indigo fabric oxidize and turn dark blue. This process creates resist patterns where the fabric resists the dye, resulting in beautiful shibori tie dye designs.
What are some key materials needed for a jacquard indigo tie dye project?
For a jacquard indigo tie dye project, essential materials include real indigo dye, soda ash, a dyeing kit, and fabric like cotton or rayon. You’ll also need latex gloves to protect your hands, detergent for pre-washing the fabric, and folding and tying tools such as rubber bands or string to create resist patterns during the dyeing process.
How can you ensure the fabric takes the dye very well in shibori tie dye?
To ensure the fabric takes the dye very well in shibori tie dye, soak the fabric in a soda ash solution before dyeing to prepare it for the indigo. Use folding techniques to bind areas tightly, preventing the dye from reaching all parts of the fabric. Then, dip the fabric repeatedly in the indigo dye vat and let it oxidize between dips, allowing the dye to penetrate deeply and create strong color contrast.
How does the japanese dyeing technique shibori create intricate patterns on fabric?
The Japanese dyeing technique shibori creates intricate patterns by using folding and tying techniques to resist the dye in certain areas of the fabric. After folding the fabric, it is dipped into an indigo dye vat and allowed to oxidize. The fabric is then unfolded to reveal detailed and unique patterns, such as geometric shapes or natural waves, depending on how the fabric was bound.
What steps should you follow to properly dye shibori fabric using a diy indigo dye kit?
To properly dye shibori fabric with a diy indigo dye kit, start by pre-washing the fabric with detergent to remove any impurities. Use the folding and tying techniques of your choice, such as accordion folds. Prepare the indigo dye by mixing it with warm water and soda ash. Dip the fabric into the dye vat, let it oxidize, and repeat until you achieve the desired color. Finally, rinse the fabric in water until it runs clear, and then let it dry.
How can you share your indigo tie dye process with the world on YouTube?
To share your indigo tie dye process with the world on YouTube, create a detailed dyeing tutorial showing each step of the process, from preparing the fabric to folding and dyeing. Record the entire process, including how you handle the indigo vat, folding techniques, and the magic of indigo oxidation. After editing the video, upload original content with clear instructions, tips, and visuals to guide viewers through the tie dye process.