Getting Started with Group Quilting Projects for Creative Collaboration and Fun
Consider organizing a fabric exchange event where participants can bring their unused materials to share. This not only promotes sustainability but also enables others to explore new designs. Setting specific themes, like seasonal motifs or color palettes, can spark creativity across the group.
Establishing regular meet-ups can greatly enhance interpersonal connections. Create a schedule where enthusiasts can come together to brainstorm ideas, share techniques, or troubleshoot design challenges. This fosters a supportive environment where everyone can contribute their skills.
Incorporate online platforms to document progress and share finished pieces. Creating a dedicated social media group or blog encourages members to showcase their work, thus inspiring others and generating feedback. This digital presence can also help in reaching a broader audience, promoting future gatherings.
Lastly, organizing showcases or exhibitions of completed works can celebrate collective efforts and attract new participants. Providing space for local artists to display their talents encourages collaboration and continues the cycle of creativity within the fabric arts community.
Choosing the Right Theme for Your Quilting Project
Select a topic that resonates with participants’ experiences or interests. Consider personal stories, local history, or cultural heritage as potential inspirations.
Engage with your group to gather insights. Conduct brainstorming sessions where everyone can share ideas. This collective input can highlight themes that appeal to the majority, increasing enthusiasm.
Explore seasonal motifs or natural elements relevant to your community. Incorporating local flora, fauna, or geographical features can enhance connection and pride.
Incorporate social causes or awareness topics. Focusing on issues like sustainability or community support not only educates but also inspires a sense of purpose.
Research popular trends in fabric design and color palettes. Aligning the theme with current aesthetics can create a more appealing and fashionable end result.
Evaluate the skill levels of participants. Choose a theme that complements their abilities, striking a balance between challenge and feasibility.
Review successful past endeavors to identify what worked or didn’t resonate. Learning from previous experiences helps refine future themes.
Gathering Resources and Materials for Group Involvement
Identify local fabric stores to source materials at a discount. Building partnerships with these businesses can provide bulk purchasing options and exclusive deals for group endeavors.
Consider organizing a material swap where participants can exchange unused fabrics, threads, and supplies, minimizing costs and promoting community sharing.
Set up a tool library, allowing members to borrow equipment such as sewing machines, rotary cutters, and ironing boards, ensuring access to necessary tools without personal investment.
Utilize online platforms to create a wishlist of needed items. Encourage community members to support the initiative by donating relevant materials they may have on hand.
Engage local charities or non-profits that focus on textile reuse and sustainability. They may offer donations or discounted items for groups focused on community engagement.
Host informational sessions or workshops to teach participants about sourcing high-quality materials, emphasizing the difference between various fabric types for specific techniques.
Incorporate online crowdfunding campaigns to sponsor material purchases, allowing supporters to contribute, ensuring financial resources for the collective’s needs.
Leverage social media platforms to raise awareness about your group’s endeavors, potentially attracting local businesses willing to collaborate or donate supplies in exchange for promotion.
Establish a shared online document or group chat for tracking resources, facilitating communication regarding what materials are available or still needed.
Create a budget plan to effectively allocate funds for essential supplies. Be transparent about costs and the specifics of material needs to build trust and assure participants of the project’s sustainability.
Establishing Roles and Responsibilities in Team Quilting
Define specific roles for each member, such as designer, fabric cutter, piecer, quilter, and organizer. Assign responsibilities reflecting individual strengths and interests. For example, detail oriented individuals may excel in fabric selection or cutting, while others might thrive in assembly tasks.
Implementing Workflows
Create a clear workflow, starting with design sketches and fabric choice. Assign deadlines for each phase to maintain momentum. Utilize visual tools like charts or boards to track progress, ensuring everyone stays informed about tasks and timelines.
Encouraging Communication
Establish regular meetings for updates and feedback. Use collaborative platforms to share ideas and progress virtually. Empower team members to voice concerns or suggest changes, facilitating an open dialogue that enhances productivity and teamwork.
Recognize achievements to boost morale. Celebrate milestones after completing significant stages. This reinforces commitment and nurtures a positive atmosphere, making participation more enjoyable and encouraging future collaboration.
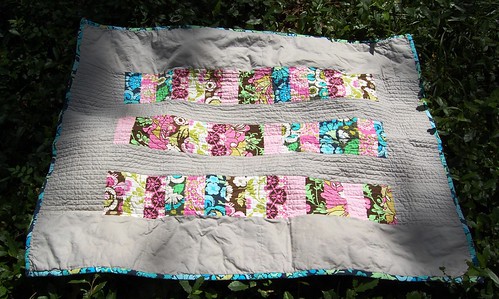
Techniques for Blending Individual Styles into a Cohesive Quilt
Utilize a defined color palette across all pieces. Select a few complementary shades that resonate with each contributor’s style. This ensures harmony while allowing personal expression.
Incorporate varied fabric textures to enrich the overall design. Mix cotton, linen, and silk, allowing each participant to select materials that reflect their aesthetic while maintaining a unified feel.
Establish common patterns or motifs that can be interpreted differently by each member. For instance, if a floral motif is chosen, individuals can explore their unique interpretations by adjusting colors and shapes.
Designate a central location for the quilt assembly. By laying out all pieces together, team members can visualize how their individual contributions interact and make adjustments as needed.
Consider utilizing a consistent stitching technique, such as straight lines or free motion quilting. This can aid in creating a seamless look, even when the fabrics and designs differ widely.
Encourage open communication during the design process. Regular discussions regarding choices and changes can foster a deeper understanding of each artist’s vision, ultimately leading to a more united finish.
Compile a mood board that showcases inspirational images reflective of the desired outcome. This can act as a visual guide, helping all contributors stay aligned while exploring their personal styles.
Experiment with layering and placement. Allowing each artist to position their piece in various configurations can unveil unexpected but appealing combinations, contributing to the quilt’s character.
Host a design review session to gather feedback and insights from all members. Constructive critiques can enhance the final assembly and promote thoughtful adjustments.
Finally, create a unifying border or frame around the quilt. This can provide a finishing touch that brings all elements together, creating a clear edge that simplifies the transition between individual contributions.
Documenting the Process for Community Engagement and Growth
Start by creating a structured plan to track components and milestones throughout your initiative. Set clear objectives for documentation, focusing on participant feedback, visual progress, and key outcomes.
Strategies for Effective Documentation
- Use a visual diary: Encourage participants to maintain journals with sketches, notes, and photos that reflect their thoughts and experiences.
- Implement surveys: Regularly distribute questionnaires to gather insights on participant satisfaction and suggestions for improvement.
- Maintain a project timeline: Document each phase, highlighting significant events, activities, and contributions.
- Record interviews: Capture participants’ stories and insights through audio or video, ensuring diverse voices are heard.
Promoting Engagement through Documentation
Display progress publicly via social media platforms and community spaces. Create a dedicated online hub for sharing updates, photos, and testimonials to engage a broader audience.
- Showcase visual content: Regularly upload images that illustrate the creative process and outcomes.
- Host community meetings: Use documented materials to spark discussions and encourage new ideas.
Collecting and sharing these records creates a lasting archive, enriching not only participants’ experiences but also inspiring future endeavors. Invest in this aspect to cultivate connections and a sense of collective achievement.
Showcasing the Final Quilt: Organizing a Community Exhibition
Secure a venue that offers enough space for display and movement. Consider local galleries, community centers, or even parks. Ensure the location is accessible to encourage attendance.
Promotion Strategies
Create buzz through social media, local newspapers, and community boards. Use flyers and word-of-mouth to reach a broader audience. Highlight unique aspects of the quilt and announce event details promptly.
Exhibition Setup
Arrange the installation with a logical flow to guide visitors. Use tables, stands, or wall spaces judiciously. Place informative plaques next to each piece to explain the materials, techniques, and stories behind the fabrications.
| Aspect | Details |
|---|---|
| Venue | Community center, local gallery, outdoor park |
| Promotion | Social media, local media, flyers, word-of-mouth |
| Setup | Logical flow, informative plaques, adequate lighting |
| Engagement | Workshops, talks, interactive stations |
Incorporate interactive elements, such as workshops or live demonstrations, to enhance participant engagement. Offer opportunities for visitors to create small pieces of their own, potentially integrating them into a future display.
Lastly, gather feedback through surveys or comment cards to improve future events and strengthen community ties. Use this opportunity to recognize and thank all contributors for their dedication and creativity.
Q&A: Group quilting project
How does participating in a round robin quilt help quilters improve their skills while working together on a single creation?
In a round robin quilt, each group member adds a block, row, or border to the quilt top before passing it to the next maker. This collaborative process allows quilters to practice different techniques, follow various quilt pattern styles, and creatively interpret instructions from others. The result is a finished quilt that reflects teamwork, diverse skills, and the joy of working together in a quilting bee or class setting.
Why is it important to press each seam carefully when assembling a block or row in a scrap quilt?
Pressing each seam properly ensures that blocks lie flat and fit together accurately, which is crucial when combining scraps of different weights and textures. A well-pressed row contributes to a square, even finished quilt top and makes it easier to trim sections as needed. This basic quilting tip helps quilters maintain precision throughout the construction process and avoid bulk at seam intersections.
How does a quilting class or bee group support the maker in understanding the basics of block construction and quilt layout?
A quilting class or bee offers a structured environment where quilters can learn the basics of creating a block, matching seams, and building a quilt pattern row by row. Group members share tips, provide feedback, and often follow a shared how-to or guideline. This support helps each maker gain confidence and results in a more cohesive and well-constructed finished quilt.
What are the benefits of downloading a holiday-themed quilt pattern, such as a Christmas block design, from a trusted how-to site?
Downloading a Christmas-themed quilt pattern provides clear instruction, printable block templates, and layout tips for creating a festive finished quilt or wall hanging. These patterns often include helpful visuals and trimming guidelines, making them perfect for quilters looking to explore related interests or see more ideas for seasonal creations. It’s an easy way to find inspiration and start a themed project with confidence.
How does each member of the group influence the final size of the quilt in a collaborative quilting project?
In a collaborative quilting project, each member of the group typically contributes a block, border, or row, and these contributions collectively determine the size of the quilt. Depending on how many members participate and how large each contribution is, the group may need to decide early on whether the goal is a lap quilt, bed quilt, or wall hanging to maintain proportion and unity throughout the whole quilt.
Why is it important for quilters to decide on a layout before assembling the whole quilt in a group project?
When creating a quilt as a member of the group, deciding on the layout in advance helps ensure that all the blocks or rows fit together and the design remains cohesive. Early decisions about color balance, block arrangement, and the overall size of the quilt guide each quilter’s contribution, helping avoid confusion and making it easier to assemble the whole quilt once all pieces are completed.